3D Printing for Absolute Beginners: Idea to Object in 5 Steps
3D printing turns a digital 3D model into a physical object by laying down melted plastic one thin layer at a time, usually 0.2 mm thick, until the shape exists. As a beginner you need to get five things right: find a 3D model, save it in a format the printer accepts, choose a material, read the quote, and place the order. You do not need to own a printer, learn CAD, or open a slicer — this guide walks all five steps with real formats and real prices from our Austin print farm.
The Five Steps of 3D Printing, Start to Finish
Every print follows the same path, whether it comes off a hobby machine on a kitchen table or a farm of Bambu Lab H2S and P2S printers running overnight. Steps 1 and 2 are the only ones you actually do yourself. Everything after that is machine work, and it is where most beginners discover the whole thing is simpler than the internet made it sound.
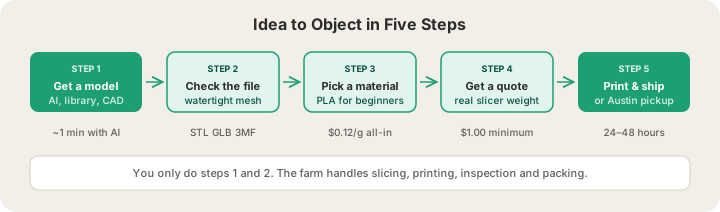
- Get a 3D model — generate one from a text prompt, download one, or have one designed.
- Check the file — it has to be a closed, watertight mesh in an accepted format.
- Pick a material — PLA for nearly everything you print in your first year.
- Get a quote — weight multiplied by a per-gram rate, with no setup fee.
- Order — printing, inspection, packing, then shipping or local pickup.
Step 1: Get a 3D Model
A printer cannot invent geometry. It needs a model: a closed three-dimensional surface that describes every face of the object, measured in millimetres. There are four realistic ways to get one, and the right choice depends mostly on how specific your idea is and whether exact dimensions matter.
| How to get a model | Time to a usable file | Cost | Best when |
|---|---|---|---|
| Describe it to an AI generator | About a minute | Free to try | You have an idea but no CAD skills |
| Download from a model library | Minutes | Free to a few dollars | Someone has already made the thing |
| Convert a photo to 3D | A few minutes | Free to try | You have a picture, not words |
| Hire a designer or learn CAD | Days to weeks | Your time, or a design fee | Dimensions have to be exact |
The fastest route to a first print is the AI generator at /design. You type a description, it builds a mesh, and the result goes straight to the printer without you touching modelling software. Prompt wording matters more than beginners expect — vague nouns produce vague blobs — and /blog/best-text-to-3d-prompts collects the phrasings that reliably produce printable geometry. If you have a photograph of the object rather than words for it, the same generator can work from an image instead.
Step 2: Check the File Is Actually Printable
This is where beginners lose the most time, because a file can look perfect on screen and still be unprintable. Two things have to be true. First, the file has to be in a format the service accepts. Second, the mesh has to be watertight: a sealed shell with no holes, no flipped faces, and no surfaces floating loose inside the model.
| Format | Accepted? | Size limit | What to know |
|---|---|---|---|
| STL | Yes | 100 MB | The universal mesh format. No colour, no units metadata. |
| GLB | Yes | 100 MB | What our AI generator exports. Carries colour and texture. |
| 3MF | Yes | 100 MB mesh, 40 MB sliced | Modern replacement for STL. Stores units, so scale never guesses. |
| G-code | Yes | 40 MB | .gcode or .gcode.3mf. Already sliced, and safety-validated on upload. |
| OBJ | No | — | Not accepted. Re-export as STL from whatever produced it. |
| STEP | No | — | CAD solid, not a mesh. Export an STL from your CAD tool. |
Beyond format, three checks catch nearly every real problem: the model has to fit the 340 × 320 × 340 mm build volume of an H2S, no wall should be thinner than about 1 mm, and the mesh has to be closed. Our uploader runs a server-side mesh review before you ever reach checkout, so you get told about a problem rather than discovering it in a failed print. If you want the full picture on which container to hand over and why, /blog/stl-vs-obj-vs-3mf-vs-step-export-formats-explained compares the formats in depth.
Step 3: Pick a Material
Filament choice is a single dropdown, and for a beginner the answer is almost always PLA. It prints cleanly, holds fine detail, comes in every colour, needs no enclosure, and sits at the bottom of the rate card alongside PETG. Our pricing is all-in per gram — filament and normal machine time together — so the material you choose is the whole story on price.
| Material | Price per gram | Pick it for | Watch out for |
|---|---|---|---|
| PLA | $0.12 | Almost everything: models, decor, prototypes, toys | Softens in a hot car |
| PETG | $0.12 | Outdoor parts, bottle holders, anything that flexes | Slightly softer detail |
| ABS | $0.12 | Tough mechanical parts, enclosures | Can warp on large flat shapes |
| TPU | $0.13 | Phone bumpers, grips, gaskets, straps | Rubbery, not rigid |
| ASA | $0.14 | Full sun exposure, UV resistance | The premium of the five |
The practical rule: start with PLA, and only step up when the part has a job PLA cannot do. A desk organizer is PLA. A phone mount that lives on a Texas dashboard is PETG or ASA. A watch strap is TPU. /blog/pla-vs-petg-vs-abs-vs-asa-vs-tpu runs the full comparison including strength, heat tolerance and print behaviour.
Step 4: Get a Quote
3D printing is priced by weight, not by hour or by complexity. Where possible we run your model through a real OrcaSlicer slice — the same software that drives the printer — so the gram count in your quote is the gram count the machine will actually extrude, not a volume estimate off the bounding box. That is why a hollow vase and a solid block of the same outer size quote very differently.
| Rule | What it means |
|---|---|
| PLA at standard 0.2 mm layers | $0.12 per gram, all-in |
| Premium 0.1 mm layers | 1.75× the per-gram rate |
| Smallest possible part | $1.00 minimum, and billable weight rounds up to the whole gram |
| US shipping | $7 flat, free over $50 |
| Ordering multiples | 5% off at 5 or more units, 10% off at 10 or more |
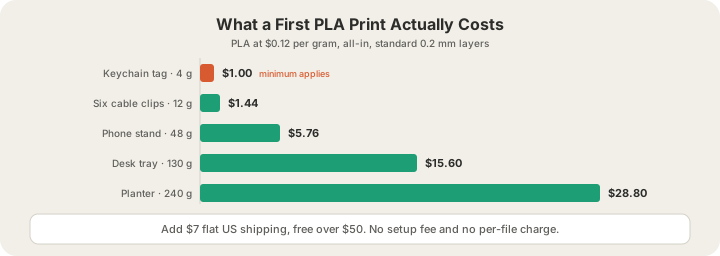
All-in means there is no setup fee, no per-file charge and no minimum order beyond that $1.00 floor per part. A 48 g phone stand in PLA is $5.76, plus $7 flat shipping, which is $12.76 to your door. The full rate card lives at /pricing, and /blog/how-much-does-custom-3d-printing-cost walks through how the same part prices out across materials and quantities.
Step 5: Printing, Inspection, and Delivery
Once you order, the job is queued for the next idle machine. Our fleet is Bambu Lab H2S and P2S printers, each with a 4-tray AMS that feeds up to four filaments per job, so a plate you sliced for four colours does not need four separate prints; a model we slice for you runs in the single filament you chose. Uploaded G-code passes a safety validation pass before it touches a printer, and live camera streams cover the plates while they run. You watch your order move through five stages: placed, printed, packed, shipped, delivered.
Most orders print and ship within 24 to 48 hours. If you are in Austin you can skip shipping entirely and collect the part in person. Nothing in that sequence waits on you. Once the file is accepted and paid for, the next decision you have to make is where to put the finished object.
Five Mistakes That Ruin a First Print
- Wrong units. A model designed in inches and exported as a unitless STL arrives 25.4 times too big or too small. 3MF stores units, which is why it is the safest format to hand over.
- Walls thinner than the nozzle. Anything under about 1 mm may not survive slicing, and a 0.3 mm decorative fin will simply not appear in the finished part.
- Ignoring the build volume. The H2S plate is 340 × 320 × 340 mm. Larger models need to be split into parts and joined after printing.
- Uploading OBJ. It is a common export default and it is not accepted. Re-export as STL or GLB.
- Paying for 100% infill. A solid interior can cost several times what the same part costs at 10% infill, and adds far less strength than people assume. Between 15 and 25% covers nearly everything.
FAQ
Do I need to buy a 3D printer to start 3D printing?
No, and for most beginners buying one first is the expensive way round. A print service gives you an industrial machine, calibrated filament and a finished part for a few dollars, with none of the bed levelling, nozzle clogs or failed overnight runs. Buy a printer once you know you print often enough to justify maintaining one.
What file format should a beginner use for 3D printing?
STL if you just want the safest, most universal option, or 3MF if your software offers it, because 3MF stores real-world units and eliminates scaling accidents. GLB works too and is what our AI generator produces. OBJ is not accepted, so re-export it as STL first.
How much does a first 3D print cost?
Small parts land between $1 and $6. PLA is $0.12 per gram all-in with a $1.00 minimum per part, so a 4 g keychain is $1.00, a 12 g set of cable clips is $1.44 and a 48 g phone stand is $5.76. US shipping is $7 flat and free over $50.
How long does it take to get a 3D printed part?
Machine time depends on the object: under an hour for a keychain, three to four hours for a phone stand, eight or more for a desk tray. End to end, most orders from our Austin farm are printed, inspected, packed and shipped within 24 to 48 hours.
Ready to get started?
Upload a 3D model for instant pricing, or generate one with AI.