Supports 101: When You Need Them and How to Avoid Them
Supports are sacrificial plastic a slicer prints under the parts of your model that have nothing beneath them, then you snap the plastic off and throw it away. You need them when a surface leans more than about 45 degrees away from vertical, or when it hangs over open air with nothing anchoring it at either end. They work, but they cost real grams, leave marks on the surface they touched, and take time to remove — so the best support is the one your design never needed.
What 3D Printing Supports Actually Do
An FDM printer builds a part one thin layer at a time, and every layer needs something solid underneath to land on. Where a layer sticks out past the one below it, the fresh extrusion has only air to sit on. A small step out is fine — the new line still overlaps most of the previous line and cools bonded to it. A big step is not: the plastic droops before it solidifies, curls up as it cools, and the surface goes from smooth to something that looks chewed.
Supports fix this by printing a thin, deliberately weak lattice up from the plate (or from the part) to meet the overhang and give it a landing surface. That lattice is printed at low density and with a small gap to the part above it, so it holds the overhang up during printing but breaks away afterwards. It is not part of your object; it is scaffolding you pay for and then bin.
The 45-Degree Rule
The single most useful number in 3D printing is 45 degrees, measured from vertical. At 45 degrees each new layer sits on roughly half the width of the layer below, which is enough overlap to stay put. Push past that and the unsupported fraction grows quickly.
| Lean from vertical | What the surface does | Supports? |
|---|---|---|
| 0-45° | Each layer lands mostly on the one below. Clean. | No |
| 45-60° | Slight droop, visible stair-stepping underneath | Usually not |
| 60-70° | Edges curl, underside goes rough and stringy | Yes if it shows |
| 70-90° | Plastic extrudes into air, sags or detaches | Yes |
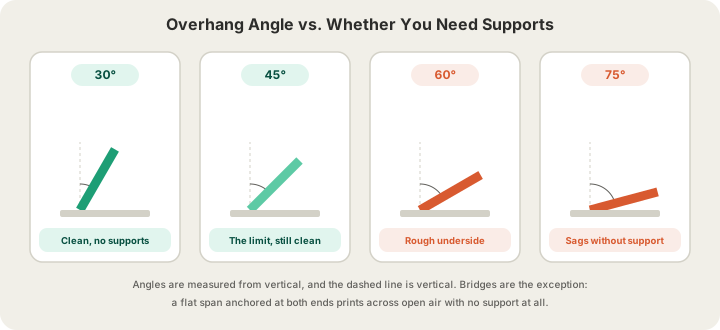
Bridges are a separate case, and a much more forgiving one. A bridge is a horizontal span anchored at both ends, like the top of a doorway or the ceiling above a printed cavity. Because the extrusion is stretched taut between two solid anchors, the printer can lay it straight across open air. Short spans under about 5 mm are effectively free. On our machines, with part cooling running hard, spans in the 5 to 30 mm range usually bridge cleanly with nothing underneath. Beyond that the middle starts to sag and supports earn their keep.
Support Types, and When to Use Which
Modern slicers give you a handful of support strategies rather than one. The choice matters more than most people expect, because it changes both the grams and how much sanding you do afterwards.
| Type | Material used | Removal | Best for |
|---|---|---|---|
| Normal / grid | Most | Pliers; can fuse to thin walls | Flat undersides, heavy overhangs |
| Tree / organic | About half of normal | Snaps off in branches | Figurines, curved organic shapes |
| On build plate only | Least | Easiest, nothing touches the part | Parts whose overhangs all reach the plate |
| With interface layers | Slightly more | Peels off in a sheet | Cosmetic undersides that must look good |
Tree supports are the default worth reaching for first. Instead of a solid block under the whole overhang, they grow a few thin trunks from the plate and branch out only where contact is needed. Less plastic, less contact area, and far less time with a pair of pliers. Normal grid supports still win under broad flat undersides, where a tree's few contact points would let the middle sag.
The setting people forget is support-on-build-plate-only. If every overhang in your part can be reached from the plate, this option stops the slicer from growing supports up off the model itself, which is where the ugliest scars come from. It also means nothing has to be dug out of an internal cavity.
What Supports Actually Cost
Supports are printed plastic, so they are billable weight like any other plastic. Our PLA rate is $0.12 per gram all-in, which covers filament and normal machine time together, with weight rounded up to the whole gram and a $1.00 minimum per part. That makes the cost of a support strategy very easy to see. Take a phone stand that weighs 34 g on its own, printed three ways.
| Orientation | Support type | Support grams | Billable | PLA cost |
|---|---|---|---|---|
| Flat on its back | None needed | 0 g | 34 g | $4.08 |
| Upright as designed | Tree | 9 g | 43 g | $5.16 |
| Upright as designed | Normal grid | 19 g | 53 g | $6.36 |
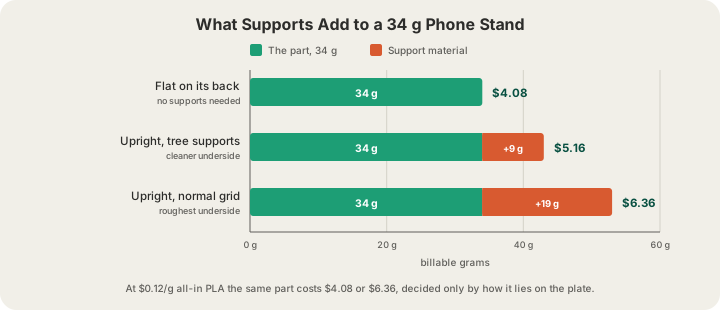
That is a 56% swing on an identical object, decided entirely by how it lies on the plate. The gap widens on premium 0.1 mm layers, which price at 1.75 times the standard rate: the same 19 g of grid support goes from $2.28 to $3.99 of pure waste. It widens again across a batch, where the support tax multiplies by every unit. Full rates are on /pricing, and the same weight-driven arithmetic shows up in our breakdown of /blog/3d-printing-infill-explained.
Six Ways to Avoid Supports Entirely
- Rotate before you support. Most parts have one orientation where every overhang falls inside 45 degrees. Try laying the part on its back, on its side, and at 45 degrees before accepting the slicer's default.
- Chamfer instead of overhanging. A lip that sticks straight out at 90 degrees needs support; the same lip with a 45-degree chamfer underneath prints itself. This is the single highest-value habit in design-for-FDM.
- Teardrop your horizontal holes. A round hole printed on its side has a 90-degree overhang at the top that always sags. Adding a small pointed roof turns it into two 45-degree walls, and the hole comes out round.
- Split the model. Two halves printed flat and glued, or joined with a printed dowel, is often cheaper and cleaner than one piece full of scaffolding. It also sidesteps the 340 x 320 x 340 mm build volume for oversized parts.
- Turn arches into bridges. A flat span prints across open air; a curved arch has a shallow region at the top that does not. Flattening the top of an opening is usually invisible and always cheaper.
- Fillet the transition. Where a horizontal shelf meets a vertical wall, a generous fillet on the underside rotates the surface gradually through the 45-degree limit instead of crossing it in one step.
One caution on all of these: changing orientation changes which direction your tolerances live in. Holes printed vertically come out slightly undersized, and a feature that fit perfectly flat on the plate may not fit when the part is stood on end. Our guide to /blog/3d-printing-tolerances-guide covers the compensation numbers for both cases.
When You Should Just Use Supports
Support avoidance can be taken too far. Redesigning a model for two hours to save nine grams is a bad trade, and some geometry genuinely has no support-free orientation. Reach for supports without guilt when:
- The model is organic — a figurine, a bust, a scanned object. There is no flat face to find.
- It is a one-off prototype and your time is worth more than the plastic.
- The overhanging surface is internal or hidden, so scarring does not matter.
- Splitting the part would put a seam somewhere structurally or visually unacceptable.
How Supports Work When You Order From Us
Upload a raw mesh at /print and we slice it in OrcaSlicer to quote it, which means the number you see already contains whatever supports the part needs in the orientation we chose. There is no separate support line item and no surprise later: supports are grams, grams are the price. Our operators remove them by hand before packing, and the part is photographed before it ships.
If you want the support decision yourself, slice the plate in Bambu Studio or OrcaSlicer and upload the sliced file instead. A .gcode.3mf carries your exact support type, density and interface settings straight into the queue — see /blog/what-is-a-3mf-file for what is inside one, and /blog/how-to-export-sliced-file-bambu-studio for the four-minute export walkthrough. Sliced uploads are capped at 40 MB; raw STL and GLB meshes get 100 MB.
Either way the file passes G-code safety validation before a machine touches it, and the H2S and P2S printers in the Austin farm run under live cameras with auto-eject, so a support failure at 2 a.m. is caught rather than repeated forty times. Most orders print in 24 to 48 hours and ship for a $7 flat US rate, free over $50.
FAQ
What angle needs supports in 3D printing?
Anything leaning more than about 45 degrees from vertical. Between 45 and 60 degrees you will usually get away with it at the cost of a slightly rough underside. Past 60 degrees the edges start curling, and past 70 the extrusion has nothing to hold it at all. Flat bridges anchored at both ends are the exception and can span far further unsupported.
Do supports cost extra at a print farm?
They cost their weight. Because our pricing is all-in per gram at $0.12 for PLA, support material is billed exactly like the part itself — no surcharge, no separate fee, just more grams. In the phone stand example above, grid supports added 19 g and $2.28 to a $4.08 part. Rotating the model to remove them is the cheapest optimisation available.
Are tree supports always better than normal supports?
Not always. Trees use roughly half the material and leave far fewer marks, which makes them the right first choice for figurines and curved shapes. Under a broad flat overhang, though, a tree's small number of contact points lets the middle droop between branches, and normal grid supports give a better result. Try trees first and fall back to grid if the underside sags.
Will removing supports leave marks on my print?
Some, always. Support contact points leave small nubs and a matte texture wherever they touched. Interface layers reduce this to a peelable sheet and a nearly smooth surface, and light sanding removes the rest. If a face has to be flawless, the real fix is orienting the part so that face never needs support in the first place.
Ready to get started?
Upload a 3D model for instant pricing, or generate one with AI.