Why Your Multi-Color Print Failed: AMS Errors Decoded
A multi-colour print almost never fails because the model was wrong. It fails at one of four places in the AMS: the filament could not get off the spool, the freshly cut tip could not get back into the path, the slicer's slot mapping did not match what was physically loaded, or the purge was too small to flush the old colour out of the nozzle. Every AMS error message and every ruined plate traces back to one of those four. This guide reads the symptom on the plate and names the cause.
What an AMS Colour Change Actually Does
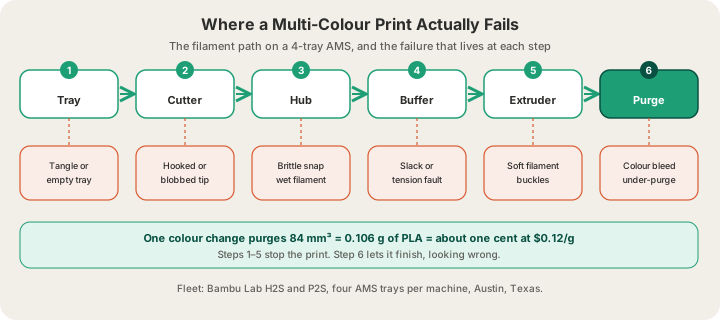
A single-colour print asks the filament path to work once. A multi-colour print asks it to work again, and again, and again, while the machine is already hot and moving. Understanding the six steps in one change tells you exactly where to look when a job dies at 04:00.
- The printer finishes the last extrusion of the outgoing colour and retracts the filament back out of the melt zone.
- The filament is cut a fixed distance behind the nozzle so the tip has a clean, predictable shape.
- The outgoing strand is wound back into its tray and the AMS hub selects the incoming tray.
- The incoming filament is driven forward through the hub, the PTFE tube and the buffer until the extruder gears catch it.
- The nozzle purges 84 mm³ of plastic into a prime tower, into infill, or into the chute. That figure is Bambu's own H2S profile: a 280 mm³ flush at a 0.3 multiplier.
- Printing resumes at the next toolpath, and on a striped model the whole sequence starts over a few seconds later.
Four of those six steps are mechanical. That is the honest reason multi-colour printing has more ways to go wrong than single-colour printing does, and it has nothing to do with the plastic being harder to melt.
The Six AMS Failures You Will Actually Hit
| What you see | What actually happened | The fix |
|---|---|---|
| Job pauses, tray reported empty | The spool ran dry, or the run-out sensor lost a nearly finished spool mid-change | Start long multi-colour jobs on fresh spools instead of finishing old ones |
| Repeated feed retries, then a pause | A crossed wind on the spool has the filament trapped under an earlier loop | Unspool a metre by hand, free the loop, re-tension before reloading |
| Change fails seconds after the cut | The cut tip cooled into a hook or a blob and would not re-enter the hub | Check nozzle temperature and retraction; trim the tip flat before reloading |
| Filament snapped inside the tube | Wet or aged filament went brittle and broke on a bend | Dry the spool, replace the AMS desiccant, keep the lid shut between jobs |
| Right shapes, wrong colours | The file carried no slot mapping, or the trays were reloaded in a different order | Export a .gcode.3mf or a 3MF, which stores the tray assignment in the file |
| Streaks of the previous colour | The purge was too small to fully flush the nozzle between colours | Raise the flush multiplier, or reorder so light colours never follow dark |
Tip shape is the quiet killer
Most jams that look like a hardware fault are a tip-shape problem. When the AMS retracts a strand, a small amount of molten plastic stays on the end. If it cools into a hook, a mushroom or a long stringy tail, the strand will not slide back through the hub cleanly on the next attempt, and the machine reports a feed error at the tray it just left. Look at the filament ends sitting in the trays after a failure: a good tip is a flat, blunt cylinder. A bad one is obvious the moment you know what you are looking at.
Moisture breaks filament where it bends
PLA absorbs water from the air, and wet PLA is brittle rather than merely stringy. The AMS puts a permanent bend in every strand at the hub and again at the buffer, so that is where a brittle strand snaps. The tell is a print that runs fine on one colour and fails only when it reaches the tray holding the oldest spool. Desiccant in the AMS is not decoration, and a spool that has sat open on a shelf in an Austin summer deserves a drying cycle before it goes near a twelve-hour multi-colour job.
Wrong colours means the mapping never arrived
This one is not a jam at all. The part comes out geometrically perfect with the colours swapped, which means the printer was told to use tray 1 where you meant tray 3. A plain .gcode file encodes the toolchanges but nothing about which spool belongs to which extruder index, so it depends entirely on the trays being loaded in the order the slicer assumed. A .gcode.3mf carries the AMS slot mapping inside the container, along with a plate thumbnail, which is why we ask for it. If you slice your own plates, /blog/how-to-export-sliced-file-bambu-studio walks through both export paths, and /blog/what-is-a-3mf-file explains why 3MF is the only format that can express per-object colour at all.
Colour Bleed Is a Purge Problem, and Purge Is Money
The sixth failure is the one that still ships. The print completes, the geometry is right, and the white text on the black plaque has a grey ghost around it. That is under-purge: the nozzle still held pigment from the previous colour when it started drawing the new one. The fix is more purge, and more purge has a price you can calculate exactly.
At 84 mm³ per change and a PLA density of 1.26 g/cm³, one colour change costs 0.106 g of filament. At our $0.12 per gram all-in PLA rate, that is roughly one cent. Nobody cares about one cent. What matters is that the number of changes is set by how the colours are arranged in Z, not by how many colours you used, and that number can swing by two orders of magnitude on the same model.
| Colour layout | Changes | Purge | Billable weight | PLA cost |
|---|---|---|---|---|
| Four separate single-colour parts | 0 | 0 g | 40 g | $4.80 |
| Colours grouped into bands by height | 12 | 1.3 g | 42 g | $5.04 |
| Colours grouped by region | 60 | 6.4 g | 47 g | $5.64 |
| Colours striped every layer | 450 | 47.6 g | 88 g | $10.56 |
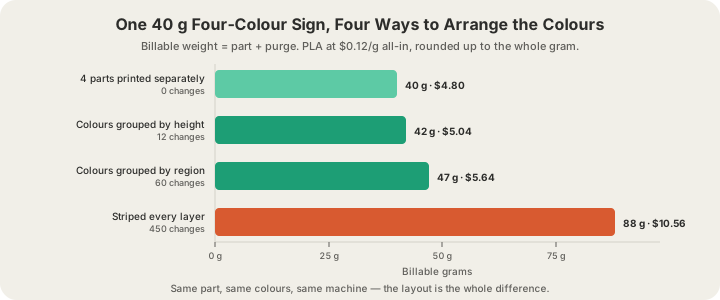
Every one of those 450 changes is also 450 more chances for the tip, the hub or the buffer to misbehave, and about 1.3 minutes of machine time that lands in the hours the sliced file reports. The full breakdown of where multi-colour time goes is in /blog/how-long-does-3d-printing-take, and the rate card itself lives at /pricing.
Design So the AMS Barely Has to Work
- Group colours by height wherever the design allows. A logo that changes colour at three Z heights needs three changes, not three hundred.
- Stay inside four colours per job. The AMS has four trays, and a fifth colour means a second print and a glue-up.
- Order colours light to dark within each band. Purging white out of a nozzle that just ran black takes far more material than the reverse.
- Split truly separate colour zones into separate parts when they meet on a flat face. Two clean single-colour prints often beat one striped one on both cost and risk.
- Export a .gcode.3mf so the tray mapping travels with the file instead of living in your memory.
- Put the purge into infill or into a sacrificial object rather than a tall prime tower, so the wasted plastic at least does structural work.
What Happens to a Failed Multi-Colour Job Here
Our fleet is Bambu Lab H2S and P2S machines in Austin, Texas, each with a 4-tray AMS. Uploaded G-code passes an automated safety validation pass before a printer will accept it, live camera streams cover every plate while it runs, and finished plates auto-eject so the next job can start. When a multi-colour job fails on our side, it is re-queued and reprinted; you see the order move through placed, printed, packed, shipped and delivered, and a failed attempt is not something you pay for. More on how the queue works is in /blog/what-is-a-3d-print-farm.
Quotes come from a real OrcaSlicer slice of your model wherever possible rather than a volume estimate, and a plate you sliced yourself is quoted from the grams and hours that file already reports, which is why the purge on a striped model shows up in the price before you order instead of surprising anyone afterwards. Upload at /print in STL, GLB, 3MF or G-code. OBJ is not accepted, so convert first. Maximum part size is 340 × 320 × 340 mm, US shipping is $7 flat and free over $50, and Austin pickup is free.
FAQ
Why does my AMS keep failing on the same slot?
A fault that follows the slot rather than the colour is mechanical: a tangled spool, a spool too wide or too soft for the tray, or debris in that feed path. A fault that follows the colour when you move it to a different tray is the filament itself, almost always moisture or a bad tip shape. Swapping the spool between two trays is a thirty-second experiment that tells you which of the two you have.
How many colours can one print use?
Four per machine, because the AMS holds four spools. You can design a part with more colours than that, but it has to be split into separate plates and assembled, which changes both the price and the lead time. Four is a real design constraint worth accepting early rather than discovering in the slicer.
Does multi-colour cost more per gram?
The per-gram rate does not change, and there is no multi-colour surcharge on top of it. PLA is $0.12 per gram all-in whether the part is one colour or four. What changes is how many grams exist: on a plate you sliced yourself, the 84 mm³ of purge per change is already inside the weight the file reports, and that weight is what we bill. A part grouped sensibly by height barely notices. A part striped every layer roughly doubles.
Can I just send you the multi-colour file?
Yes, and it has to be a sliced one: a .gcode.3mf you painted and sliced yourself in Bambu Studio or OrcaSlicer, because that is the file that carries the toolchanges and the tray mapping through to the printer. A model we slice for you prints in the single filament you choose. Billable weight rounds up to the whole gram with a $1.00 minimum per part, so even a tiny four-colour test badge is a dollar. If the model came from an AI generator rather than a CAD package, check that the mesh is watertight before you assign colours to it, because a hole in the shell is a hole in the colour boundary too.
Ready to get started?
Upload a 3D model for instant pricing, or generate one with AI.