Bambu Studio for Beginners: Slice Your First Model
Bambu Studio is the free slicer Bambu Lab ships for its printers, and slicing your first model in it takes about ten minutes. Pick a printer profile, tell it which filament you are using, drag an STL onto the virtual plate, choose a layer height, and press Slice Plate. The software turns your triangles into toolpaths and reports two numbers that matter: how long the print takes and how many grams of plastic it eats.
You do not need a printer to use it, either. Bambu Studio runs perfectly well on a laptop with no hardware attached, which makes it a genuinely good way to learn what settings do before you spend money — or to prepare a file you send to a farm like ours. Here is the whole workflow, with the parts beginners get stuck on called out.
What Bambu Studio Actually Does
A slicer is a translator. Your model file describes a shape — a watertight shell of triangles with no notion of plastic, gravity or nozzles. A printer wants a script: heat to this temperature, move here at this speed, extrude this much. Slicing is the step in between, and it is called slicing because the software literally cuts the model into horizontal layers and works out the path of each one.
Every decision that affects how a print looks and what it costs is made here. Layer height, wall count, infill density, supports, brim, seam placement — none of these live in the model file, and all of them live in the slicer. That is why two people printing the same STL can get parts that differ by an hour of print time and several dollars of material.
Setting Up Bambu Studio the First Time
The installer runs a short wizard on first launch. It asks three things and they all matter more than they look.
- Which printer. Pick the exact model and nozzle size. This sets bed dimensions, speeds, acceleration and the start-up routine — a slice is only valid for the machine it was made for.
- Which filaments. Tick the ones you actually own or plan to use. PLA Basic is the sane starting point; you can add more later from the filament dropdown.
- Sign in, or don't. An account enables cloud sync and remote monitoring. Slicing works fully offline without one.
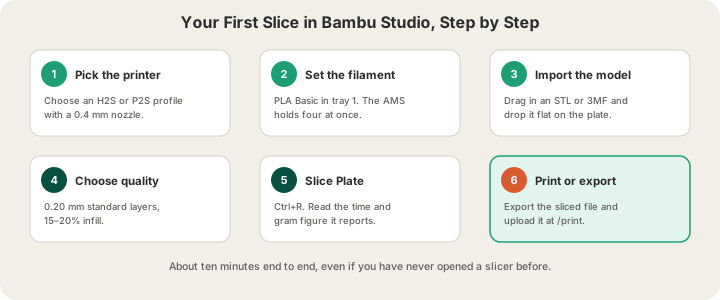
If you are preparing files for our farm rather than your own machine, choose an H2S or P2S profile with a 0.4 mm nozzle. Those are the printers your job will land on, and their build volume is 340 x 320 x 340 mm on the H2S — bigger than most beginners expect, which is a pleasant problem to have.
Slicing Your First Model, Step by Step
Open Bambu Studio and you get a 3D view of an empty build plate with a settings column on the left and a Slice Plate button top-right. Work left to right, top to bottom.
- Import the model. Drag an STL or 3MF into the window, or use File > Import > Import 3MF/STL. It lands wherever it was modelled, which is often floating or half-buried.
- Drop it flat. Right-click the object and use Place on Face to rest the flattest surface on the plate. Orientation decides where supports are needed and which direction the part is weakest in.
- Check the scale. Bambu Studio shows real dimensions in the right-hand panel. Models exported from CAD in inches arrive 25.4 times too small — a very common first-print surprise.
- Set the quality preset. Standard 0.20 mm is the default and the right answer for most things.
- Set the filament. The dropdown at the top of the left column maps each AMS slot to a material and colour.
- Press Slice Plate (Ctrl+R). The view switches to Preview and shows the estimate.
- Read the preview. Scrub the layer slider on the right to watch the print build up. This is where you catch supports in stupid places and first layers that are barely touching the plate.
The Four Settings That Actually Matter
Bambu Studio exposes several hundred parameters if you switch to Advanced mode. Beginners need four of them. Everything else is a refinement of a print that already works.
| Setting | Sensible default | What raising it does | Effect on cost |
|---|---|---|---|
| Layer height | 0.20 mm | Finer detail, visibly smoother curves | 0.10 mm prints at our 1.75x premium rate |
| Infill density | 15% | Stiffer, heavier part | Near-linear: more grams, more dollars |
| Wall loops | 2-3 | Much stronger part per gram added | Small — best strength-per-dollar lever |
| Supports | Off until needed | Rescues overhangs past ~45 degrees | Adds grams you throw away |
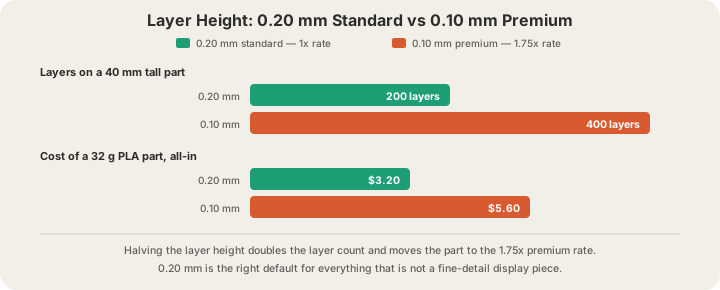
Layer height is the one beginners over-tune. Going from 0.20 mm to 0.10 mm doubles the number of layers, which roughly doubles the print time, and at our farm it moves the part onto the premium rate. On a 40 mm tall model that is 200 layers becoming 400, and a 32 g PLA part going from $3.84 to $6.72. Worth it for a face or a fine texture; wasted on a bracket.
Infill is the second lever, and it is more forgiving than people fear: 15% is plenty for display pieces, 20-25% covers most functional parts, and above 50% you are paying for plastic no one will ever load. Adding a wall loop usually beats adding infill for strength, and we go through the numbers in /blog/3d-printing-infill-explained.
Reading the Slice Result
After slicing, the panel reports total time, filament length in metres and filament weight in grams. That gram figure is the useful one. Multiply it by the material rate and you have your cost, whether you are buying spools yourself or sending the job out: 24 g of PLA is $2.88 at our all-in rate of $0.12 per gram, with weight rounded up to the whole gram and a $1.00 minimum per part.
The colour-coded preview is worth a minute too. Switch the view mode to Line Type and Bambu Studio paints walls, infill, supports and bridges in different colours, so you can see exactly where the material is going. If a third of the plate is support colour, re-orienting the model is cheaper than printing it.
No Printer? Slice It Anyway and Send It Here
Learning the slicer without owning a machine is a legitimate strategy, and it is the one we would recommend to anyone deciding whether a printer is worth buying. You get real time and material numbers on your actual models, and you can hand the finished slice to someone with hardware. We take .gcode and .gcode.3mf up to 40 MB at /print, alongside STL, GLB and 3MF meshes, and the export procedure is covered in /blog/how-to-export-sliced-file-bambu-studio.
Upload a sliced file and the scale and infill controls lock, because your slicer already fixed those as coordinates. Upload a mesh instead and we slice it in OrcaSlicer to measure it, and you keep the sliders. Either route runs on Bambu H2S and P2S machines in Austin with live cameras and G-code safety validation on the job, ships $7 flat in the US, and is free over $50. If you do not have a model to start from at all, /design will generate one from a text prompt.
One more habit worth forming early: check the model before you slice it, not after. Non-manifold edges, flipped normals and paper-thin walls all survive an import and only announce themselves as a failed print. /blog/why-print-ready-matters-mesh-validation covers what to look for and how we screen files server-side.
FAQ
Is Bambu Studio free?
Yes. It is a free download for Windows, macOS and Linux with no account required to slice, and no paid tier. It is open source, forked from PrusaSlicer, which is itself descended from Slic3r. Signing in only adds cloud storage and remote printer monitoring.
Can I use Bambu Studio without a Bambu Lab printer?
For slicing, yes — pick any Bambu profile and it will happily prepare files on a machine with nothing plugged in. What it will not do is drive a third-party printer well; the profiles and network features are built around Bambu hardware. If you want to slice for a non-Bambu machine, OrcaSlicer is the close cousin to reach for.
What is the difference between Bambu Studio and OrcaSlicer?
They share ancestry and most of the interface. Bambu Studio is the first-party build, tightly integrated with Bambu printers and the AMS. OrcaSlicer is the community fork with broader printer support and extra calibration tools. We run OrcaSlicer on the server side to measure uploaded meshes, and a plate sliced in either one prints the same on our machines.
What file formats can I import into Bambu Studio?
STL, 3MF, OBJ, STEP and a few others import fine. Note that our upload accepts STL, GLB, 3MF and G-code only — OBJ is not accepted — so if your source file is an OBJ, run it through Bambu Studio and export a 3MF or a sliced file. The differences between the mesh formats are covered in /blog/stl-vs-obj-vs-3mf-vs-step-export-formats-explained.
Ready to get started?
Upload a 3D model for instant pricing, or generate one with AI.