Color Matching Filament to Brand Colors
You cannot dial a hex code into an FDM printer the way you dial one into a design tool. Filament comes in the colours the manufacturer pigmented, so brand matching is a selection problem, not a mixing problem: you choose the closest stocked spool, then control the four variables that change how that spool reads once it is a physical object. Done properly, a printed part lands close enough that nobody at the trade show notices. Done by eyeballing a hex on a monitor, it does not.
Why a Brand Hex Code Never Survives the Trip to Plastic
A hex code describes light your screen emits. A printed part describes light it fails to absorb and throws back at you. Those are different physical systems with different achievable ranges, and the mismatch is worst exactly where brands like to live: saturated oranges, electric blues, and any green brighter than the pigments commonly loaded into PLA. Your monitor can hit those. A pigmented thermoplastic frequently cannot, no matter which spool you buy.
Two more things intervene before the part reaches an eye. Filament pigment is mixed in batches, so two spools of the same nominal colour from the same brand can differ slightly. And the surface of an FDM part is not flat: it is a stack of extruded lines, each one a tiny cylinder with its own highlight. That texture scatters light and shifts perceived lightness in ways a flat ink swatch never does.
The Four Variables That Change a Colour After You Pick It
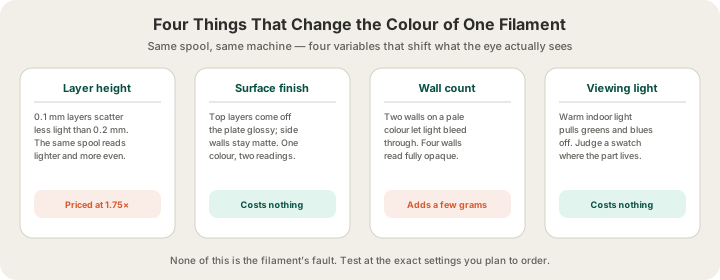
| Variable | What it does to the colour | What it costs |
|---|---|---|
| Layer height | 0.1 mm layers scatter less light than 0.2 mm and read slightly lighter and more even | Premium 0.1 mm prices at 1.75× the standard rate |
| Surface and orientation | Top layers come off the plate glossy, vertical walls stay matte; the same spool reads two ways | Nothing, if you orient for it |
| Wall count | Two walls on a pale colour let light bleed through and wash it out; four walls read fully opaque | A few extra grams at $0.12/g |
| Viewing light | Warm indoor light pulls greens and blues off their daylight value more than reds | Nothing, but you have to test under it |
Layer height is the one with a price attached, and it is worth understanding before you spend it. Finer layers make a smoother, more uniform surface, which reads as a cleaner, slightly lighter version of the same pigment. That is a real improvement on a logo face and a waste of money on a bracket nobody looks at. /blog/layer-height-explained covers the full tradeoff, including why the finer setting is not automatically the better one.
The Swatch Test: How to Actually Match a Brand Colour
Screens lie, product photos lie harder, and filament brand names lie most of all. The only reliable method is to hold candidate colours next to the real reference under the real light. Here is the process we use for branded work.
- Get a physical reference. A printed brand-guide swatch, a branded product, a business card. Not a screenshot.
- Shortlist three or four filament colours in the right family. Ordering more than four is wasted, because four is what one AMS can print in a single job.
- Print them as one swatch card at the settings you will actually order, not at whatever is fastest.
- Judge the card next to the reference under the light the finished part will live in: office fluorescents, a trade-show booth, daylight through a window.
- Pick the winner, then note the exact colour name, the layer height and the wall count. That combination is your spec, and it is what you repeat next time.
A swatch card is four tiles of about 40 × 25 × 1.6 mm joined by a thin spine, so roughly 9.5 g of PLA. Four colours on one card means slicing the plate yourself and uploading the sliced file — a model we slice comes out in the single filament you picked. Laid out side by side, the four colours meet on nearly every layer, so the card racks up around 32 AMS changes. At 84 mm³ of purge per change and a PLA density of 1.26 g/cm³, that is about 3.4 g of extra material, and it is already inside the weight the slicer reports. Total billable weight is 13 g, which at $0.12 per gram all-in is $1.56.
What Colour Testing Costs, and What Skipping It Costs
There is a counterintuitive result buried in our pricing worth pointing out. Billable weight rounds up to the whole gram and every part carries a $1.00 minimum, so four separate 2 g chips are four separate parts at $1.00 each: $4.00. The single four-colour card, purge included, is $1.56. Grouping the swatches into one job is cheaper than printing them alone, which is the opposite of how multi-colour usually works.
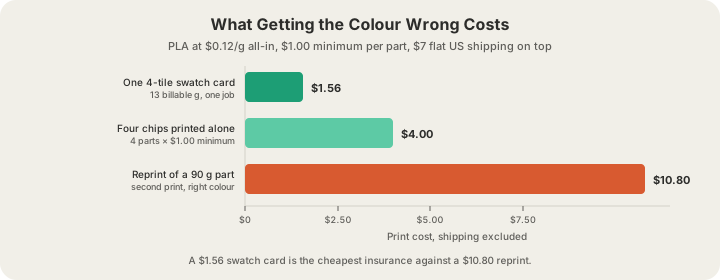
The reprint column is the real argument. A 90 g display piece is $10.80 in PLA, and if the colour is wrong you pay it twice plus $7 flat shipping on the second box. On a run of fifty parts the arithmetic stops being a rounding error entirely. Bulk pricing takes 5% off at five or more units and 10% off at ten or more, which means a colour mistake on a bulk order is discounted along with everything else, and still expensive. The full rate card is at /pricing.
Multi-Colour Logos: Four Trays, and a Purge Bill
Once you have your matched colours, a branded part usually wants two or three of them at once. Our machines run a 4-tray AMS, so up to four colours print in a single job with no human touching the printer. The constraint that bites is not the colour count, it is the layout: every colour change purges 84 mm³, and a logo that alternates colours on every layer can rack up hundreds of changes while one grouped into Z bands needs a handful. /blog/ams-errors-decoded works through that arithmetic and the failure modes that come with it.
Send colour assignments as a sliced plate, a .gcode.3mf exported from Bambu Studio or OrcaSlicer. It carries the slot each colour runs from, and the operator maps those slots onto the AMS trays as an explicit step when the job is queued, so your matched brand colours land where you meant them. A model we slice prints in the single filament you chose, whatever colour the file carries. We accept STL, GLB, 3MF and G-code; OBJ is not accepted, so convert before uploading. /blog/what-is-a-3mf-file is the deeper dive on what the format holds.
When Filament Cannot Get There
Some brand colours have no filament equivalent, and pretending otherwise wastes everyone's money. Neon and fluorescent brand palettes, metallics that are meant to look like polished metal rather than sparkle, and very specific corporate blues are the usual suspects. In those cases the honest answers are: print in a neutral colour and paint or vinyl-wrap the visible face, split the design so the brand colour lives on a small applied badge rather than the whole body, or accept the closest match and specify it consistently so every part in the family is wrong the same way. Consistency reads as intentional. Drift does not.
Material choice narrows the palette too. PLA at $0.12/g has by far the widest colour range because it is the most printed material in the world. PETG at $0.12/g, ABS at $0.12/g, TPU at $0.13/g and ASA at $0.14/g are each stocked in fewer colours, so an outdoor sign that needs ASA for UV stability has genuinely fewer options than an indoor display piece in PLA. /blog/pla-vs-petg-vs-abs-vs-asa-vs-tpu covers which material the part actually needs before you start narrowing colours inside it.
FAQ
Can you match a Pantone or hex code exactly in 3D printing?
Not exactly, and no FDM service can. Filament is pigmented in fixed colours rather than mixed to order, so the process is picking the closest stocked spool and then controlling layer height, wall count and surface finish so it reads right. For saturated brand colours a good match typically lands in the noticeable-but-close band rather than invisible. If exactness is contractual, print neutral and paint the visible face.
Why does my print look different from the filament on the spool?
A spool is a smooth, round, densely wound cylinder. A printed part is a stack of extruded lines with texture, gaps and internal air. Light behaves differently on the two. Thin walls on pale colours make it worse because the light passes through and comes back off the infill. Four walls instead of two usually closes most of the gap for a few extra grams.
How many brand colours can one print use?
Four in a single job, because the AMS holds four spools. A fifth colour means splitting into separate prints and assembling. Design around four early rather than discovering the limit in the slicer; most brand palettes have a primary, a secondary and a neutral, which fits comfortably.
How do I order a colour swatch before committing to a run?
Slice the card yourself with a colour on each tile and upload the sliced plate at /print. A four-tile card is about 13 billable grams, so $1.56 in PLA, plus $7 flat US shipping, or free pickup in Austin. Most orders print in 24 to 48 hours, so a swatch round trip costs a couple of days and a couple of dollars before you commit to a fifty-part run.
Ready to get started?
Upload a 3D model for instant pricing, or generate one with AI.