How Big Can You 3D Print? Build Volumes Explained
In one piece, on our farm, the answer is 340 × 320 × 340 mm. That is the build volume of the Bambu Lab H2S, and it is the largest single part we can print without cutting it up: roughly a basketball with room to spare, or a shoebox stood on end. Anything bigger is printed in sections and bonded, which is how full-size helmets, floor lamps and props get made on machines this size.
What a build volume actually is
A build volume is the box a printer can reach inside: how far the toolhead travels left to right (X), how far the plate moves front to back (Y), and how high the gantry can climb (Z). Your model has to fit inside that box in some orientation, walls and all. It is a hard limit, not a guideline — a slicer will refuse to slice a part that pokes out of the plate, and a farm catches the problem at upload rather than at hour six of a print.
The usable volume is always slightly smaller than the number on the spec sheet. A brim or skirt adds a few millimetres around the footprint. Prime and purge lines live at the plate edge. Multi-colour jobs need a purge tower standing next to the part, and at 84 mm³ of purge per filament change that tower takes real estate. The toolhead also needs clearance above the tallest point of the model.
The X3D build envelope: 340 × 320 × 340 mm
| Axis | Limit | In inches | What it constrains |
|---|---|---|---|
| X (left to right) | 340 mm | 13.4 in | Longest flat dimension on the plate |
| Y (front to back) | 320 mm | 12.6 in | The tighter of the two plate axes |
| Z (height) | 340 mm | 13.4 in | How tall one standing part can be |
Y is the axis that catches people out. Because it is 20 mm shorter than the other two, a part that measures 335 mm across will fit one way on the plate and fail the other way. If your model is close to the limit, rotating it 90 degrees is often the whole fix.
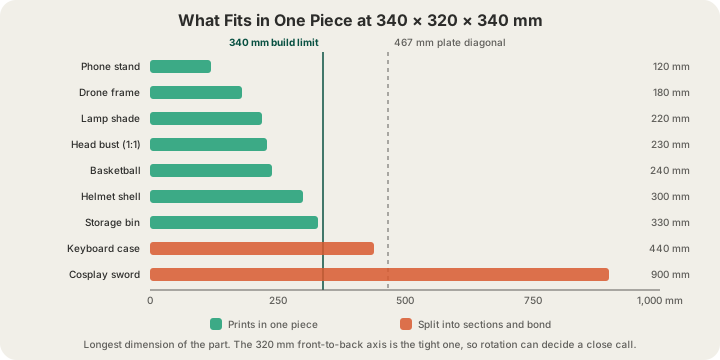
What fits in one piece
| Object | Longest dimension | One piece? |
|---|---|---|
| Phone or tablet stand | 120 mm | Yes, easily |
| Drone frame plate | 180 mm | Yes |
| Table lamp shade | 220 mm | Yes |
| Life-size head bust | 230 mm | Yes |
| Basketball-sized sphere | 240 mm | Yes |
| Full-face helmet shell | 300 mm | Yes, with careful orientation |
| Shoebox-sized storage bin | 330 mm | Yes, on a 340 mm axis |
| Full-size keyboard case | 440 mm | No — diagonal or split in two |
| Cosplay sword | 900 mm | No — split into three |
There is one more trick available before you start cutting. A part does not have to sit square to the plate: laid corner to corner, the usable footprint is the diagonal of a 340 by 320 mm rectangle, which is about 467 mm. That is a 37% gain in reach for free.
Height is the axis that bites
Fitting in Z and printing well in Z are different questions. Height is measured in layers, and at our standard 0.2 mm layer height a 340 mm part is 1,700 of them stacked on a footprint that may be a few square centimetres. Choose the premium 0.1 mm layer finish, priced at 1.75× the standard rate, and the same part is 3,400 layers.
Tall, narrow parts are also the ones most likely to be knocked off the plate by their own inertia as the toolhead changes direction. If a model can be laid down or split into two shorter halves, it usually should be. Our printers stream live video and every sliced job passes a G-code safety validation step before it runs, so a failure gets caught and requeued rather than quietly wasting a spool — but the cheapest failure is the one designed out.
Big prints cost more, but only by weight
There is no size surcharge in our pricing. A part is priced at $0.12 per gram all-in for PLA, whether it is 5 mm or 300 mm across, with a $1.00 minimum per part and billable weight rounded up to the whole gram. What makes big parts expensive is geometry: double the edge length of an object and you multiply its volume by eight.
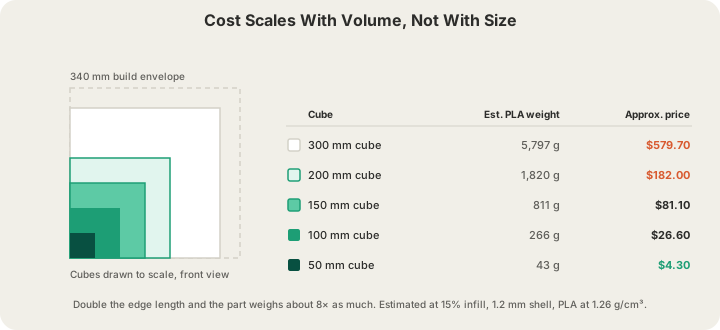
| Cube edge | Volume | Est. PLA weight | Price at $0.12/g |
|---|---|---|---|
| 50 mm | 0.13 L | 43 g | $5.16 |
| 100 mm | 1.0 L | 266 g | $31.92 |
| 150 mm | 3.4 L | 811 g | $97.32 |
| 200 mm | 8.0 L | 1,820 g | $218.40 |
| 300 mm | 27 L | 5,797 g | $695.64 |
Those weights assume a hollow shell about 1.2 mm thick at 15% infill, PLA at 1.26 g/cm³. They move a lot with settings, which is exactly the point: on a small part infill is worth a few cents, and on a 300 mm part it is worth hundreds of dollars. Dropping a display piece from 15% to 10% infill is the single biggest lever you have, and /blog/3d-printing-infill-explained covers where that stops being safe. Hollowing a decorative model, or splitting a solid one into a thin shell with a printed base, is the other.
Printing bigger than the build volume: split and join
Every large printed object you have seen — a full suit of cosplay armour, a metre-tall lamp, a life-size prop — was printed in sections. Splitting is a design step, not a failure, and doing it deliberately gives a better result than a printer that could swallow the whole thing in one go, because each section can be oriented for its own strength and surface finish.
- Cut on a flat plane where a seam is already implied: a panel line, a shoulder, the underside of a base.
- Keep each section inside 335 × 315 × 335 mm, leaving margin for brims and purge.
- Add alignment features — pins and sockets, or a dovetail — so the halves cannot be glued on crooked.
- Give the pins 0.2 to 0.3 mm of clearance per side; see /blog/3d-printing-tolerances-guide for how FDM holes actually come out.
- Bond with cyanoacrylate for speed or two-part epoxy for strength, and design a glue channel so squeeze-out has somewhere to go.
- Fill, sand and prime the seam if the piece is going to be painted.
Orientation matters more once a part is split. Layer lines are the weak direction in FDM, so cut a long part across its length rather than along it, and place each section so the load runs across layers instead of pulling them apart.
Before you upload: check the bounding box
Open your model and read its bounding box in millimetres. That is the number that decides everything, and the most common way it goes wrong is units. An STL file stores no unit at all — it is a bag of triangles — so a model authored in inches arrives 25.4 times too small, and one authored in centimetres ten times too small. A 3MF file carries its units and orientation with it, which is why it is the format we recommend for anything close to the limit; /blog/stl-vs-obj-vs-3mf-vs-step-export-formats-explained compares them all.
We accept STL, GLB, 3MF and G-code (.gcode or .gcode.3mf). OBJ is not accepted, so export as 3MF or STL instead. STL and GLB uploads go up to 100 MB, and pre-sliced files up to 40 MB. Where we can, the quote comes from a real OrcaSlicer slice of your model rather than a volume estimate, so the size and weight you are charged for are the ones the printer will actually run at /print.
How the farm handles an oversized job
Our fleet is Bambu Lab H2S and P2S machines, each with a four-tray AMS, running in Austin, Texas. Large jobs are watched on live camera streams, sliced G-code passes safety validation before a machine will accept it, and finished plates auto-eject so the next job can start. Most orders still ship in 24 to 48 hours; a multi-section build is quoted as a set of parts and printed in parallel across machines rather than serially on one. US shipping stays $7 flat and is free over $50 no matter how large the box, and local pickup in Austin is free — worth knowing when the finished object is a metre of lamp. There is more about the setup on /farm.
FAQ
What is the biggest thing you can 3D print in one piece?
On our machines, 340 × 320 × 340 mm — about the size of a basketball or a shoebox on end. Slender parts can stretch to roughly 467 mm by lying across the plate diagonal. Beyond that, the object is split into sections and bonded, and there is no practical upper limit on the finished piece.
Does a bigger 3D print cost more per gram?
No. The rate is $0.12 per gram all-in for PLA at any size, with a $1.00 minimum per part. Big prints are expensive because volume scales with the cube of the dimensions: a 200 mm cube weighs roughly eight times what a 100 mm cube weighs, so it costs roughly eight times as much.
How do I know if my model fits before I order?
Check the bounding box in your CAD or slicer and compare it against 340 × 320 × 340 mm, remembering that the 320 mm axis is the tight one. Upload it and the size check runs automatically, so a model that does not fit is caught before checkout instead of after.
Can you print a part in sections and assemble it for me?
We print and ship the sections; assembly and finishing are yours, because glue-up, sanding and paint are where a large piece gets its character. Send the model with the cuts already made if you have them. If it arrives whole and oversized, we will tell you where it needs to be split rather than guessing on your behalf.
Ready to get started?
Upload a 3D model for instant pricing, or generate one with AI.