How Long Does 3D Printing Take? Real Times From a Print Farm
Most 3D prints take between 30 minutes and 30 hours of machine time. A keychain-sized part is off the plate in under an hour, a palm-sized object like a phone stand runs three to four hours, and something helmet-sized prints overnight and well into the next day. Delivery runs on a different clock: because a farm has many printers working at once, most orders from our Austin farm are printed, inspected, packed and shipped within 24 to 48 hours no matter how long any single part sat on a plate.
How Long Does 3D Printing Take, by Part Size
The honest answer to a print-time question always starts with the part. Below are times we actually see on a Bambu Lab H2S running PLA at standard 0.2 mm layers with normal walls and 15 to 20% infill — the settings that cover the large majority of jobs that come through the farm. Prices next to them use our all-in PLA rate of $0.12 per gram.
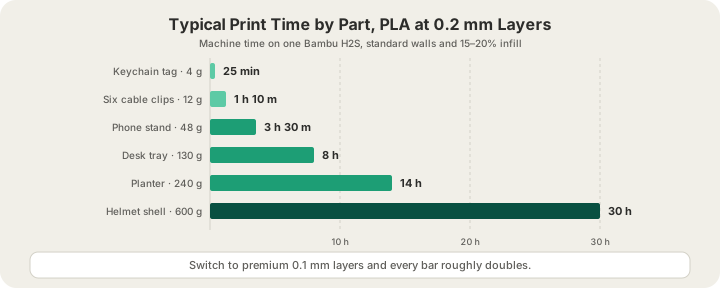
| Part | Weight | Typical time at 0.2 mm | PLA price |
|---|---|---|---|
| Keychain tag | 4 g | 20–30 min | $1.00 (minimum) |
| Six cable clips on one plate | 12 g | About 1 hour | $1.44 |
| Phone stand | 48 g | 3–4 hours | $5.76 |
| Desk organizer tray | 130 g | 7–9 hours | $15.60 |
| Planter | 240 g | 12–16 hours | $28.80 |
| Cosplay helmet shell | 600 g | 26–32 hours | $72.00 |
Weight is a decent first guess but a bad final answer, because a printer is not paid by the gram — it is paid by the layer. A 40 g wide flat plate and a 40 g tall thin tower weigh the same and print nothing alike. The tower has several times as many layers, and each layer carries a fixed cost in acceleration, travel moves and the small pause while the nozzle starts a new perimeter.
What Actually Drives Print Time
Print time is layers multiplied by the time per layer. Everything that changes your estimate is really changing one of those two numbers. Here is how the common settings move the total, using the 8-hour desk tray above as the baseline.
| Change | From | To | Effect on print time |
|---|---|---|---|
| Layer height | 0.2 mm | 0.1 mm | Roughly doubles it: twice as many layers |
| Height in Z | 80 mm tall | 160 mm tall | Roughly doubles it, at the same wall count |
| Scale, all axes | 100% | 200% | Roughly 4x to 8x, since volume grows with the cube |
| Infill density | 20% | 50% | Adds roughly 25–50% |
| Wall perimeters | 2 walls | 4 walls | Adds roughly 10–20% |
| Colours | 1 colour | 4 colours | Adds a swap on every change, on a plate sliced for it |
Layer height is the biggest single lever
Halving the layer height doubles the layer count, and that lands almost one-for-one on the clock. Our standard is 0.2 mm, which is invisible on most functional parts. Premium 0.1 mm layers exist for display pieces where you can see the stepping on a curved surface, and they cost 1.75× the per-gram rate on top of the extra hours. If a print quote surprises you with a long duration, layer height is the first thing to check.
Tall parts cost more time than heavy parts
Z height is the second lever, and it is the one people forget. Orientation changes it for free: the same bracket lying flat may need 200 layers, while standing on end it needs 700. On the farm we orient parts for a balance of strength, surface quality and support usage, but when you design the model yourself, a shape that prints short and wide finishes sooner than one that prints tall and narrow.
Infill and walls are smaller dials than people think
Going from 20% to 50% infill adds real hours, but nowhere near the strength people expect for that money — the strength curve flattens long before the cost curve does, which /blog/3d-printing-infill-explained walks through with numbers. Adding wall perimeters is usually the better trade: two extra walls typically add 10 to 20% to the time and more real-world strength than doubling infill.
Multi-colour prints buy their colours with time
A 4-tray AMS can feed four filaments into one print, but the printer has to purge the old colour out of the nozzle at every change. On Bambu's own H2S profile that is 84 mm³ of purged plastic per change (a 280 mm³ flush at a 0.3 multiplier), and a model that alternates colours every layer racks up hundreds of those changes. Those changes only exist on a plate that was sliced for them, which today means one you painted and sliced yourself; a model we slice for you runs in a single filament and never stops to swap.
Machine Time Is Not Delivery Time
This is the distinction that resolves most confusion about 3D printing speed. Machine time is how long one printer is occupied by one job. Order time is how long you wait for a box. They are only loosely related, because a farm runs jobs in parallel rather than in sequence.
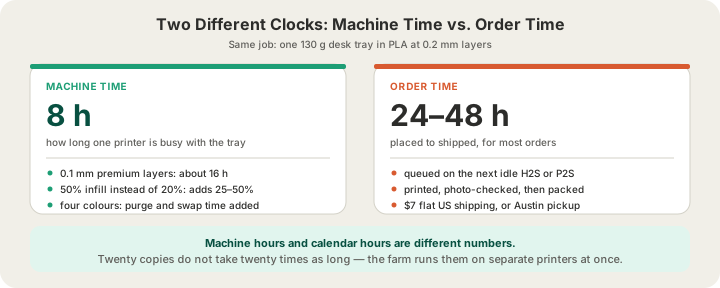
Twenty copies of an 8-hour part do not take 160 hours. They go onto separate printers and finish in roughly the time of one, which is the whole economic point of a farm. /blog/what-is-a-3d-print-farm covers how the scheduling works, and /blog/rapid-prototyping-48-hours follows a single design through the loop from prompt to a part you can hold.
The stages you actually see on an order are placed, printed, packed, shipped and delivered. Between them sit the pieces that consume calendar time rather than machine time: waiting for an idle plate, the photo inspection after the print (live camera streams cover the plates while they run), packing, and the carrier handoff. That is where the 24 to 48 hour window comes from. US shipping is $7 flat and free over $50; if you are in Austin, local pickup removes the carrier step entirely.
How to Make a Print Finish Sooner
- Stay at 0.2 mm layers unless a visible curved surface genuinely needs 0.1 mm. This is the single biggest saving available.
- Design short and wide rather than tall and narrow. Fewer layers is fewer hours.
- Drop infill from 50% to 20% and add a wall perimeter instead. Faster and usually stronger.
- Hollow out solid volume. A 3 mm shell prints in a fraction of the time of a solid block and weighs a fraction as much, which cuts the price too.
- Split an oversized model at a natural seam. Two halves on two printers finish in half the wall-clock time and dodge the 340 × 320 × 340 mm build limit.
- Group colours into zones instead of striping them per layer, so the AMS swaps a few times rather than hundreds.
- Upload pre-sliced G-code if you already sliced it yourself. It is accepted up to 40 MB and skips a step, though it still passes safety validation.
Beginners who want the whole workflow rather than just the timing should start with /blog/3d-printing-for-absolute-beginners, which covers getting a model, checking the file and reading a quote. The current material rates all live at /pricing.
FAQ
How long does a small 3D print take?
A keychain, a cable clip or a small figurine base takes 20 minutes to about an hour at 0.2 mm layers. Filling a whole plate with copies of a small part is far more efficient than printing them one at a time, since the printer does one heat-up and one plate cycle for the batch.
Does a faster printer make my part arrive sooner?
Only a little. Head speed shortens machine time, but your part still waits for a free plate, an inspection and a carrier pickup, and those dominate the 24 to 48 hour order window. Adding printers helps turnaround far more than making any one printer faster, which is exactly why a farm is built the way it is.
Why does the estimate say 20 hours when my object is small?
Almost always one of three causes: 0.1 mm layers instead of 0.2 mm, a part that is tall rather than wide, or high infill on a chunky solid. Check layer height first, then orientation, then infill. A slim 60 g part standing 200 mm tall genuinely can outlast a 200 g part that lies flat.
How fast can I actually get a part in my hands?
Most orders are printed and shipped inside 24 to 48 hours, and Austin customers can collect in person and skip transit altogether. Upload the file at /print for a sliced duration and price against your real geometry rather than a rule of thumb.
Ready to get started?
Upload a 3D model for instant pricing, or generate one with AI.