How to Export a Sliced File From Bambu Studio
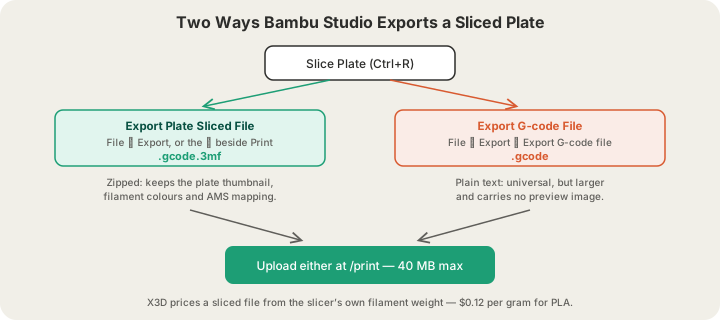
To export a sliced file from Bambu Studio, slice the plate first (the Slice Plate button, or Ctrl+R), then go to File > Export > Export Plate Sliced File and save the .gcode.3mf. If you need plain text instead, File > Export > Export G-code File writes a .gcode. Both are complete printer instructions for one specific machine, and both upload straight to our farm at /print, up to 40 MB.
The word sliced is doing real work in that sentence. An STL is geometry — a bag of triangles a printer cannot execute. A sliced file is the finished translation: every toolpath, every temperature, every retraction, in order, for one printer with one nozzle running one filament. Exporting it is the last step before a print exists, and it is the step people most often get half-right.
The Fast Path: Export a Sliced File in Four Steps
- Confirm the printer profile in the top-left dropdown matches the machine that will actually print it — including nozzle diameter.
- Click Slice Plate (Ctrl+R). Bambu Studio switches to the Preview tab and reports estimated time and filament used in grams.
- Open File > Export > Export Plate Sliced File, or click the small arrow beside the Print button and pick the same command.
- Save the .gcode.3mf somewhere you can find it. That file is now the print — nothing about it changes after this point.
.gcode.3mf vs .gcode: Which One to Export
Bambu Studio can write the same slice two ways, and the difference is packaging rather than toolpaths. A .gcode.3mf is a zip container: the G-code sits inside alongside a rendered plate thumbnail, the filament assignment for each object, and the AMS slot mapping. A .gcode is the raw instruction stream as plain text, readable in any editor and accepted by anything that speaks G-code.
| .gcode.3mf | .gcode | |
|---|---|---|
| What it is | Zip container | Plain text file |
| Plate thumbnail | Embedded | None |
| Multi-colour AMS mapping | Included | Encoded in toolchanges only |
| Typical size | Smaller (compressed) | Larger, sometimes 3-5x |
| Bambu printers | Native format | Works, no preview on screen |
| Accepted at X3D | Yes | Yes |
Export the .gcode.3mf unless you have a specific reason not to. The thumbnail means your order carries a picture of the actual plate instead of a filename, the AMS mapping means a four-colour print lands on the right trays, and the compression is what keeps a tall, dense model under our 40 MB sliced-file cap. Plain .gcode is the right answer when you are sending the file to a non-Bambu machine or post-processing it with your own script.
Slice for the Right Printer
A sliced file is machine-specific in a way an STL never is. It assumes a bed size, a nozzle diameter, an acceleration profile, and a start G-code sequence. Send an X1 Carbon slice to a printer with a different kinematic setup and the first layer can go wrong before any plastic reaches the plate.
Our fleet is Bambu Lab H2S and P2S machines, so slice against one of those profiles. The H2S build volume is 340 x 320 x 340 mm, which is roomy — most parts people worry about fitting will fit. If your model is larger than that in any axis you need to split it, and the geometry rules in /blog/why-print-ready-matters-mesh-validation are worth a read before you do.
What Actually Lives Inside the File
Every slicer writes a comment header above the toolpaths, and that header is the part a print farm reads first. We parse it on upload rather than guessing: the filament figure in it is the number your quote is built from, and several other fields decide whether the job can run at all.
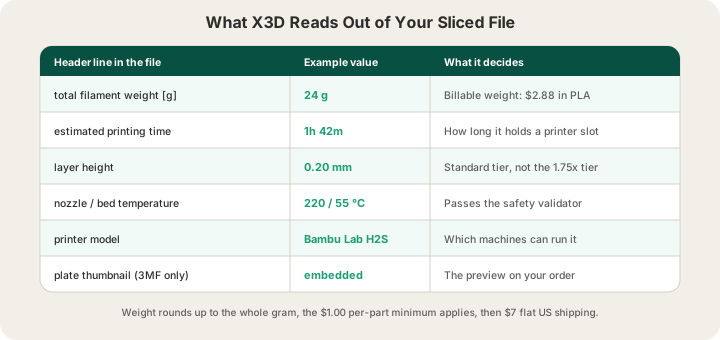
The weight line is the important one commercially. When you upload a mesh, we slice it ourselves in OrcaSlicer to measure it. When you upload something already sliced, that measurement is already done and we use yours. Either way the price is real grams times the material rate rather than a bounding-box guess — the reasoning behind that is laid out in /blog/how-much-does-custom-3d-printing-cost.
The temperature and command lines feed a safety pass. Before a file reaches a printer we scan the G-code body for things a normal slice never contains: M112 emergency stops, M502 factory resets, M211 S0 endstop overrides, M301 and M304 PID rewrites, M851 Z-probe offset changes. We also cap nozzle temperature at 320 C and bed at 130 C in absolute terms. A clean Bambu Studio export passes every one of these without you doing anything.
Uploading Your Sliced File to the Farm
Drop the file on /print and the quote appears from the header, not from a mesh estimate. One thing surprises people: the scale and infill sliders lock. That is deliberate. A sliced file is the spec — the toolpaths for 20% gyroid at 100% scale already exist as coordinates, and there is no honest way to re-scale them. If you want a different infill or a different size, change it in Bambu Studio and export again. What each infill setting costs is covered in /blog/3d-printing-infill-explained.
| Your file | How we price it | Can we change settings? |
|---|---|---|
| STL or GLB mesh | We slice it in OrcaSlicer, then charge by measured grams | Yes — scale, infill, material |
| Sliced .gcode.3mf | Charged from the weight your slicer recorded | No — the file is the spec |
| Plain .gcode | Charged from the weight your slicer recorded | No — the file is the spec |
| OBJ | Not accepted — re-export as STL or 3MF first | n/a |
That OBJ row catches people out often enough to be worth stating plainly: we accept STL, GLB, 3MF and G-code, and OBJ is not on the list. Bambu Studio will happily import an OBJ, so the fix is easy — import it, then export the sliced plate, or save a 3MF. The tradeoffs between the mesh formats themselves are in /blog/stl-vs-obj-vs-3mf-vs-step-export-formats-explained.
PLA is $0.12 per gram all-in, meaning filament and normal machine time together, with billable weight rounded up to the whole gram and a $1.00 minimum per part. Shipping is $7 flat anywhere in the US, free over $50, and Austin customers can collect in person. Full rates for the other materials are on /pricing.
Five Exports That Go Wrong
- Exported before slicing. If the Preview tab never showed layers, there are no toolpaths in the file. Slice, then export.
- Saved the project instead. A project .3mf from File > Save Project As is a model file wearing the same extension.
- Wrong printer profile. A slice for a 256 mm bed will not use the space an H2S has, and a slice for a different nozzle prints the wrong line widths.
- Plain .gcode over the 40 MB cap. Export the .gcode.3mf version of the same plate instead — compression usually solves it outright.
- All plates in one file. Export All Plate Sliced File bundles every plate in the project. Export the single plate you want printed.
If you are unsure which of these bit you, the plate thumbnail is a quick tell. Open the .gcode.3mf and look for a preview image: sliced exports have one, project files do not. Failing that, just upload it — the quote either comes back from the header or it does not, and a file we cannot read never silently becomes a wrong price. From there the job joins the queue, prints on a machine with a live camera on it, and ships in 24 to 48 hours.
FAQ
Where is the export sliced file button in Bambu Studio?
Two places, both doing the same thing. File > Export > Export Plate Sliced File in the menu bar, or the small dropdown arrow next to the Print button in the top-right after a slice completes. Both are greyed out until the plate has actually been sliced, which is the most common reason people cannot find them.
What is the difference between a 3MF and a .gcode.3mf?
A plain 3MF holds geometry and settings — it is a model you can still edit, scale, and re-slice. A .gcode.3mf holds finished toolpaths in the same zip format, plus a plate thumbnail and filament mapping. Same extension, entirely different contents. When in doubt, check the file size: sliced files are usually far larger than the model they came from.
Can I send a Bambu Studio sliced file to a print service?
Yes, if the service runs compatible hardware. We accept .gcode and .gcode.3mf up to 40 MB at /print and print them as sliced, which is the point — you keep full control over layer height, infill, supports and seam placement, and we supply the machine, the filament and the shipping. Slice against an H2S or P2S profile so the file matches the fleet.
Why can't I change scale or infill after uploading a sliced file?
Because those settings no longer exist as settings. Slicing converts them into coordinates: a 20% gyroid lattice is now a list of specific XY moves. Scaling a G-code file would stretch the toolpaths without changing extrusion widths or layer heights, which produces a worse part than re-slicing. Adjust it in Bambu Studio and export again — it takes seconds.
Ready to get started?
Upload a 3D model for instant pricing, or generate one with AI.