How to Hollow a Model and Save 40% on Material
To hollow a model you cut a cavity into the mesh itself, leaving a shell 1.2 to 3 mm thick, then add two small escape holes so trapped air and stray filament can get out. On a chunky decorative piece — a vase, a planter, an award, an AI-generated bust — that removes 30 to 50% of the plastic. Because we bill $0.12 per gram of PLA all-in, a 40% lighter part is a 40% cheaper part, and the whole operation takes about five minutes in free software.
What Hollowing a Model Actually Does
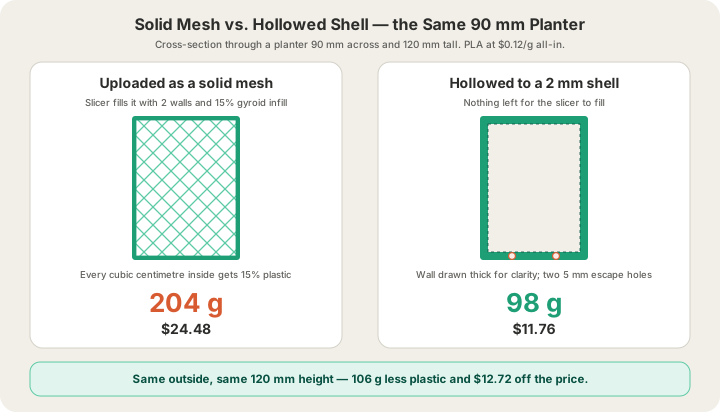
There are two different things people mean by hollow, and only one of them moves the price much. The first is what your slicer already does to every model: a few perimeter walls, solid top and bottom surfaces, and a sparse lattice in between, which is the subject of /blog/3d-printing-infill-explained. The second is hollowing the mesh — carving an actual void so the file you upload describes a shell rather than a lump. The slicer then has almost no interior left to fill, and the gram count collapses.
The distinction matters because infill has a floor. Drop below roughly 10% and the solid top layers start sagging between the lattice lines, a defect called pillowing, so you cannot keep turning that dial down. A hollowed mesh does not have that problem. There is no top surface spanning the void except the roof of the cavity itself, and you control that shape when you shell the model. Hollowing is how you get past the point where lowering infill stops being safe.
What Hollowing Actually Saves
Below are four objects run through identical assumptions: PLA at 1.26 g/cm3, 0.2 mm layers, two perimeter walls, 15% gyroid infill, and about 1.2 mm of average solid skin over the surface. The hollowed column shells each one to a 2 mm wall. Prices use our $0.12 per gram all-in PLA rate, with billable weight rounded up to the whole gram.
| Object | Printed as a solid mesh | Hollowed to 2 mm | Saved |
|---|---|---|---|
| Planter, 90 mm across x 120 mm tall | 204 g / $24.48 | 98 g / $11.76 | 52% |
| Cube award, 90 mm on a side | 200 g / $24.00 | 117 g / $14.04 | 42% |
| Bust, 120 mm tall | 77 g / $9.24 | 53 g / $6.36 | 31% |
| Figurine, 45 mm tall | 9 g / $1.08 | 10 g / $1.20 | Negative. It got heavier. |
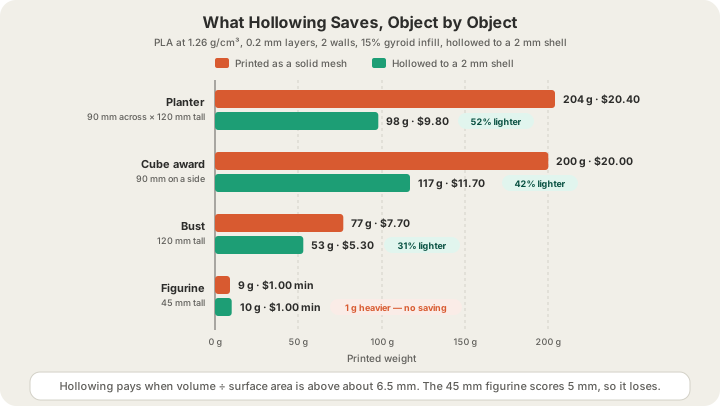
That last row is the one nobody expects. Hollowing is not a universal discount; it is a trade. You delete 15% of the interior and you add a shell that is thicker than the skin the slicer would have printed anyway. On a thick object the interior you delete is enormous and the trade is lopsided in your favour. On a small detailed figurine there is barely any interior to delete, and the 2 mm shell you wrap around all that surface area weighs more than the infill it replaced.
There is a quick test. Divide the model's volume by its surface area. Above about 6.5 mm, hollowing pays; below it, you are adding plastic. In practice that means an object with solid sections thicker than roughly 15 mm is worth hollowing, and anything that is mostly thin detail is not. A 90 mm cube scores 15 mm and saves 42%. A 45 mm figurine scores about 5 mm and loses.
How to Hollow a Model, Step by Step
1. Start From a Watertight Mesh
Shelling a mesh with holes, flipped normals, or self-intersecting geometry produces nonsense. The offset surface escapes through the gaps and you get a model that is neither solid nor hollow, usually with invisible internal walls that quietly add grams back. Fix the mesh first; /blog/why-print-ready-matters-mesh-validation covers what watertight means and how to check it. Meshes generated at /design come out closed and manifold, which is exactly why they shell cleanly. Downloaded and scanned models often do not.
2. Pick a Wall Thickness
Wall thickness is the whole decision. Too thin and the part dents under a thumb; too thick and you have given the saving back. Match it to how the object will be handled.
| Shell wall | Lines at a 0.4 mm nozzle | How it feels | Use it for |
|---|---|---|---|
| 1.2 mm | 3 | Light, flexes if you squeeze it | Small display pieces under 80 mm |
| 1.6 mm | 4 | Holds its shape | Everyday decor, figures, ornaments |
| 2.0 mm | 5 | Rigid in the hand | Vases, awards, lamp shades. The default. |
| 3.0 mm | 7 | Feels solid, will take a screw | Planters, wall mounts, anything handled daily |
Round the wall to a whole multiple of your extrusion width. A 0.4 mm nozzle lays down roughly 0.42 mm lines, so 2.0 mm fills neatly with five perimeters and nothing else. Ask for 1.9 mm and the slicer fits four lines plus a 0.2 mm sliver it has to close with gap fill, which is slower, uglier, and saves you almost nothing. The same logic applies to layer height, which /blog/layer-height-explained goes into.
3. Shell It
| Tool | Command | Wall control | Escape holes | Best for |
|---|---|---|---|---|
| Blender (free) | Solidify modifier | Exact mm | Manual | AI output and downloaded meshes |
| Fusion 360 | Shell | Exact, per face | Manual | Parametric bodies you designed |
| Meshmixer (free) | Edit, then Hollow | Offset slider | Automatic | Sculpted and scanned busts |
| Lychee Slicer | Hollow, then Drain Holes | Exact mm | Automatic | One-click hollowing, exports STL |
| OrcaSlicer / Bambu Studio | Spiral vase mode | One line only | Not needed | Open-top vessels, nothing else |
In Blender the move is a Solidify modifier with a negative offset so the wall grows inward, then apply it and delete the original inner faces if your version leaves them. Spiral vase mode is the odd one out: it is not really hollowing at all, it tells the printer to spiral one continuous wall upward with no top and no infill whatsoever. It produces the lightest possible open vessel, about 0.42 mm of plastic and nothing more, but it only works on shapes that are a single unbroken loop at every height.
Export as STL, 3MF, or GLB. We accept those three plus sliced G-code (.gcode and .gcode.3mf). We do not accept OBJ, so if your tool defaults to it, change the format before you upload. Meshes go up to 100 MB and sliced files up to 40 MB.
4. Add Two Escape Holes
A sealed cavity is a liability. Air trapped inside expands as the part warms and can bulge or crack a thin shell, condensation has nowhere to go, and nobody can inspect the inside of a closed box. Put two holes of 4 to 6 mm on a face that will sit downward or against a wall. Two, not one, because a single hole tends to hold pressure rather than vent it. If the piece will ever get wet, a planter or a bathroom item, place them at the lowest point so water actually leaves.
5. Look at the Roof of the Cavity
Hollowing a closed shape creates an internal ceiling, and an FDM printer has to bridge that ceiling in mid-air. A flat cavity roof spanning 86 mm of nothing will droop on any machine ever built. There are two fixes: dome or taper the top of the cavity so it closes gradually instead of all at once, or orient the part so the roof becomes a wall rather than a ceiling, which /blog/how-to-orient-a-model-for-strength walks through. If you do neither, the slicer will add supports inside a sealed cavity that you can never remove.
6. Re-Quote It Before You Commit
Upload the hollowed file at /print. Where possible our quote comes from a real OrcaSlicer slice of your actual geometry rather than a bounding-box estimate, so the gram count on screen is the gram count the machine will extrude. Upload the original and the hollowed version side by side and compare the two numbers. That difference, in dollars, is your saving, and you see it before you pay for anything.
What Hollowing Does Not Do
It does not make a part stronger. A shell is stiff for its weight, but there is nothing behind it. A knock that would dent a part at 15% infill can punch straight through a 1.2 mm wall. If the object carries load, add wall perimeters instead of removing material, and leave the interior alone.
It also does not cut print time as much as it cuts weight. Infill is the fastest plastic on the plate, laid down in long straight runs at full speed; perimeters are slow because the head is following the outline of your model. A part that loses half its weight to hollowing might only lose a quarter of its machine hours. That matters a great deal if you own the printer. It does not affect your invoice with us, because we price per gram all-in, so the full 40% shows up in the total.
Hollowing on Our Farm
Our fleet in Austin is Bambu Lab H2S and P2S machines with a 340 x 320 x 340 mm build volume, and that volume is exactly where hollowing earns its keep. A 300 mm vase printed from a solid mesh is a genuinely expensive object; the same vase shelled to 2 mm is an affordable one. Every plate runs under a live camera, and if you would rather not open Blender at all, leave a note at checkout asking us to shell the model and we will hollow it to 2 mm with escape holes and re-quote before printing. Every material rate is shown before you commit at /print.
FAQ
Does hollowing a model always make it cheaper?
No. Hollowing trades interior infill for a thicker shell, so it only pays on objects with a lot of interior. Divide volume by surface area: above about 6.5 mm you save, below it you add weight. Chunky decor, vases, planters and awards win big. Small detailed figurines get heavier, and under about 8 g the $1.00 per part minimum makes the difference academic anyway.
How thick should a hollowed wall be for 3D printing?
2.0 mm is the right default for display pieces on a 0.4 mm nozzle, because it fills with exactly five perimeter lines and feels rigid in the hand. Drop to 1.2 to 1.6 mm for small ornaments that nobody will squeeze, and go to 3.0 mm for planters, wall mounts, or anything handled every day. Always round to a whole multiple of your extrusion width.
Should I hollow the model or just lower the infill?
Lower the infill first, because it is free and takes one click. Once you reach 10% you have hit the practical floor, since anything lower makes the top surfaces pillow. Hollowing is what you do after that, and on a thick object it removes far more plastic than the last few percent of infill ever could.
Do I need drain holes in a hollowed 3D print?
Yes, two of them, 4 to 6 mm across, on a face that will not be seen. They vent trapped air as the part heats and cools, let the inside be inspected, and stop some hollowing tools from treating the cavity as an unreachable void and refilling it. One hole is not enough because it holds pressure instead of releasing it.
Ready to get started?
Upload a 3D model for instant pricing, or generate one with AI.