How to Split a Big Model Into Printable Parts
To split a big model into printable parts, cut it along a plane that leaves every piece inside the build volume, add alignment features so the pieces can only go together one way, and place the cut where a seam will not be seen. Our printers give you 340 x 320 x 340 mm, so anything larger gets a cut plane, a set of printed dowel pins or a dovetail, and about 0.2 mm of clearance on every mating surface. Done properly the joint disappears under a coat of primer and the assembled part is stronger than a single tall print would have been.
When a Model Actually Needs Splitting
The obvious trigger is size. Our Bambu Lab H2S machines print inside 340 x 320 x 340 mm, and a flat part can cheat that by sitting on the plate diagonal, about 467 mm corner to corner. So rotate before you cut: a 400 mm ruler that will not fit along X or Y often fits diagonally in one piece, and a part you do not have to split is always the better part. The full sizing math is in /blog/how-big-can-you-3d-print-build-volumes.
Size is only one of five good reasons to cut, though:
- Support elimination. A cut through an overhang can turn one support-heavy print into two flat-bottomed ones. See /blog/3d-printing-supports-101 for when supports are worth the scars they leave.
- Surface control. Each half can be oriented so its show face points up, instead of one compromise angle for the whole model.
- Strength. Layer lines are the weak axis of any FDM part; splitting a long arm so each piece prints along its own load direction beats standing it up.
- Colour. Separate pieces print on separate plates, avoiding the purge waste of a mid-print colour change.
- Failure recovery. A 26-hour print that fails at hour 24 costs you 26 hours. Four 6-hour pieces cost you six.
Where to Put the Cut
The cut plane is the whole decision: joint type, glue and sanding all get easier or harder depending on where you put it. Work through these in order:
- Find an existing edge. Panel lines, chamfers, a change of diameter, the underside of a lip: any feature that already casts a shadow will swallow a glue line, with no filler needed.
- Give both halves a flat face. The cut face itself is usually the best bed contact you will ever get, so orient each piece cut-face-down. Flat, wide, no brim, no supports.
- Keep the seam out of the load path. Move the cut away from the point of maximum bending moment; glue plus pins is strong, but it is not continuous plastic.
- Do not cut through thin walls. A 1.6 mm wall has no room for a dowel hole. Move the plane a few millimetres until it passes through something with meat in it, or use a lap joint that thickens the seam locally.
- Stop at two or three pieces. Every extra piece adds a seam to sand, an alignment error, and a part minimum to pay. Two is almost always right.
Joint Types Compared
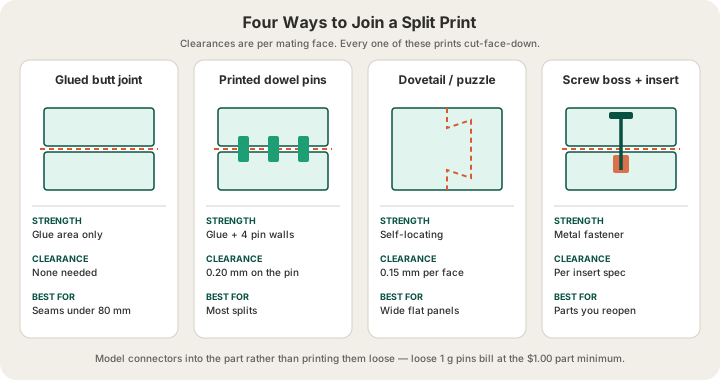
| Joint | How it aligns | Clearance | Best for |
|---|---|---|---|
| Glued butt joint | By hand, by eye | None | Seams under about 80 mm |
| Printed dowel pins | 3-4 pins in blind holes | 0.20 mm on the pin | Most splits, most of the time |
| Dovetail / puzzle | Interlocks, self-locating | 0.15 mm per face | Wide flat panels and plates |
| Tongue and groove | One continuous ridge | 0.20 mm per face | Shells, vases, lamp bodies |
| Screw boss + insert | A metal fastener | Per insert spec | Anything you need to reopen |
A glued butt joint is fine for a short seam that nothing pulls on. Past roughly 80 mm you cannot hold two faces in register by hand while the glue grabs, and a 0.5 mm misalignment across a long joint is very visible. Printed dowel pins fix that: three or four cylinders, 4 to 6 mm across and 8 to 10 mm long, sunk into blind holes on both faces. They locate the halves instantly and roughly double the glue area, because the pin walls bond too.
Model those pins onto one half rather than printing them loose; the reason is a pricing detail below. Dovetails and tongue-and-groove trade a tighter tolerance for a joint that cannot shear, and a screw boss with a brass heat-set insert is the answer whenever the part holds something you will want back.
Tolerance: the Number That Decides Whether It Fits
Every mating feature needs clearance or the pieces will not go together. FDM walls come out slightly thicker than nominal because the plastic swells leaving the nozzle, so a 5.0 mm pin in a 5.0 mm hole is an interference fit at best and a snapped pin at worst. Model the hole 0.2 mm larger than the pin and you get a firm push fit that still takes glue; flat interlocking faces want 0.15 mm per face. Our full breakdown of press fits, slip fits and shrinkage lives in /blog/3d-printing-tolerances-guide.
How to Cut the Model in Bambu Studio or OrcaSlicer
You do not need CAD for this. Both Bambu Studio and OrcaSlicer have a cut tool that handles the plane, the connectors and the tolerance in one dialog, and it works on any imported mesh.
- Import the model and orient it the way you want the finished part to look, before you cut.
- Select the object and press C, or pick the Cut tool from the left toolbar.
- Drag the cut plane to your chosen height. The dialog reports the plane position in millimetres, so you can land it exactly on a panel line.
- Turn on Connectors, choose Plug or Dowel, and place three or four around the perimeter rather than clustered in the middle.
- Set the connector tolerance to about 0.2 mm. This is the single field that decides whether the halves press together or split a wall.
- Keep both the upper and lower parts and enable Place on cut, so each piece lands cut-face-down on the plate.
- Export the result as a 3MF. That keeps every piece, its orientation and its connectors in one file.
3MF is the right container here because a split model is no longer one solid, and an STL carries only loose triangles with no object grouping. When you upload to us we accept STL, GLB, 3MF and sliced G-code (.gcode or .gcode.3mf). We do not accept OBJ, so convert first if that is what your modelling tool gave you.
What Splitting Actually Costs
Our pricing is all-in per gram, so split-model arithmetic is easy to predict: PLA is $0.12 per gram, billable weight rounds up to the whole gram, and there is a $1.00 minimum per part. Cutting a model in half does not change how much plastic it contains, so the price barely moves. What moves the price is the number of separate parts you create.
Take a 460 mm floor-lamp column that slices to 380 g of PLA at 0.2 mm layers. It cannot print in one piece, so here is what the realistic split plans cost:
| Split plan | Billable parts | Weight | Price |
|---|---|---|---|
| One piece at 460 mm | - | - | Will not fit |
| Two halves, glued butt joint | 2 | 190 g each | $45.60 |
| Two halves, pins modelled into one half | 2 | 192 g each | $46.08 |
| Two halves + 4 loose dowel pins | 6 | 380 g + 4 x 1 g | $49.60 |
| Four quarters + 12 loose dowel pins | 16 | 380 g + 12 x 1 g | $57.60 |
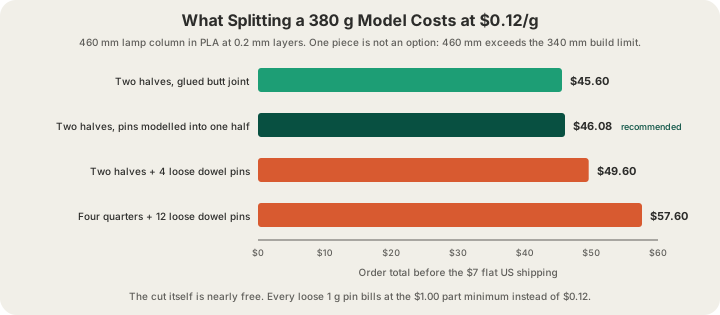
Shipping does not punish you for splitting either: $7.00 flat anywhere in the US, free over $50, no matter how many pieces are in the box. The full rate card, including the 1.75x multiplier for premium 0.1 mm layers and the bulk discounts, is on /pricing.
Gluing and Finishing the Seam
Dry fit first, every time. Push the pins home without glue, check the seam closes flush all the way round, then commit. If a pin is tight, a hand twist with a 5 mm drill bit opens the hole without wallowing it out.
- PLA and PETG: thin cyanoacrylate wicked into the closed seam, or medium CA on the pins with 20 seconds of hand pressure. Fast and strong, brittle under impact.
- Structural joints: two-part epoxy. Longer working time for alignment, and it fills the 0.2 mm clearance instead of relying on contact.
- ABS and ASA: acetone weld. The solvent melts both faces into one piece, which is the only joint here that is genuinely continuous plastic.
- Filling: CA plus baking soda, or spot putty, then 220 and 400 grit. Filler primer makes the seam vanish.
- Chamfer both cut edges by 0.5 mm before exporting. The V-groove gives glue and filler somewhere to go instead of squeezing onto the show surface.
How We Handle Oversize Models
Upload the whole model to /print even if you know it is too big. Our quote comes from a real OrcaSlicer slice of your file wherever possible, not a bounding-box estimate, so we can tell you the actual weight and the actual overrun. Say in the checkout note which face is the front and we will place the cut where the seam is least visible, then pin it.
Or control it yourself: cut, slice, and upload the G-code. We run G-code safety validation on every sliced file before it reaches a machine, then print exactly what you sent. Either way the pieces come off Bambu H2S and P2S printers in Austin, Texas, usually within 24 to 48 hours, with live camera streams while they run. Local? Pick the box up here instead of paying shipping.
FAQ
How do I split an STL that is too big to print?
Import it into Bambu Studio or OrcaSlicer, press C for the cut tool, drag the plane to a height where both halves fit inside 340 x 320 x 340 mm, enable dowel connectors at about 0.2 mm tolerance, keep both parts with Place on cut turned on, and export the result as a 3MF. No CAD package required.
How much clearance should a printed dowel pin have?
About 0.2 mm on the diameter: a 5.0 mm pin into a 5.2 mm hole. That is a push fit you can still pull apart while dry fitting but that will not rattle once glued. Dovetails and other flat interlocks want 0.15 mm per face, because two faces each contribute their own gap.
Is a glued 3D print weaker than a single piece?
At the seam, yes, but the split part can still be the stronger object overall: epoxy across a pinned joint typically outperforms the layer bond in a tall single print, which is loaded across its weakest axis. Splitting so each piece prints along its own load direction is a strength strategy, not just a size workaround. See /blog/how-to-orient-a-model-for-strength for the orientation half of the decision.
Does splitting a model make my print cost more?
Barely, as long as you do not create tiny separate parts. At $0.12 per gram all-in for PLA a 380 g model costs about $46 whether it arrives in one piece or two. But every part carries a $1.00 minimum, so four loose one-gram pins add $4.00 while the same pins modelled onto one half add $0.48.
Ready to get started?
Upload a 3D model for instant pricing, or generate one with AI.