Layer Height Explained: 0.08 vs 0.2 vs 0.28
Layer height is how thick each printed slice of your model is, and on a standard 0.4 mm nozzle the practical range runs from about 0.08 mm to 0.28 mm. For the overwhelming majority of parts the right answer is 0.2 mm — it is the default in every slicer for good reasons. Drop to 0.08 or 0.1 mm only when a curved or closely-inspected surface has to look smooth, and go up to 0.28 mm only on bulky, low-detail parts where finishing sooner is worth a visible stair-step. Everything below is what changes in each direction and what it costs.
What Layer Height Actually Is
A slicer cuts your model into horizontal slices, the printer draws one, then the Z axis steps up by exactly one layer height and it draws the next. That step is the layer height. It is not the same thing as line width: line width is set by the nozzle, so a 0.4 mm nozzle typically draws a bead a little over 0.4 mm across regardless of the layer setting. Layer height is purely how far the machine climbs between passes.
The usable range is tied to that nozzle. Go too thin and the squashed bead becomes so wide and shallow that it stops bonding reliably; go too thick and the bead has too little contact with the layer beneath it to weld properly. On a 0.4 mm nozzle that puts the comfortable window at roughly 0.10 to 0.30 mm, and Bambu Studio and OrcaSlicer ship three presets sitting inside and just under it: 0.08 mm Extra Fine, 0.20 mm Standard and 0.28 mm Draft. Those three are what almost everyone actually chooses between, which is why they are the three in this guide.
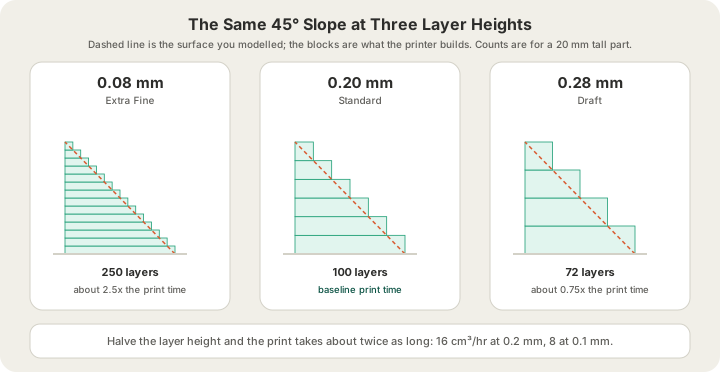
That stair-stepping is the visible consequence, and it is geometry-dependent rather than taste-dependent. On any surface that is not vertical, each layer steps sideways by an amount set by the layer height and the slope. On a 45 degree wall the step is exactly as deep as the layer is tall, so 0.28 mm layers leave a ridge three and a half times coarser than 0.08 mm ones. On a near-vertical wall the steps almost disappear at any setting; on a shallow dome they are obvious even at 0.08 mm. The right layer height depends on what shape you are printing, not on how much you like detail in the abstract.
The Three Heights, Side by Side
| 0.08 mm | 0.2 mm | 0.28 mm | |
|---|---|---|---|
| Preset name | Extra Fine | Standard | Draft |
| Layers in a 60 mm part | 750 | 300 | 215 |
| Relative print time | About 2.5x | 1x (baseline) | About 0.75x |
| Curved surfaces | Nearly smooth to the eye | Fine ridges, easy to sand out | Clearly stepped |
| Embossed lettering and relief | Crisp | Readable at normal sizes | Fine relief fills in |
| Layer bonding | Many thin welds | The tuned default | Thick beads, bonds well |
| Best for | Miniatures, jewellery, display pieces | Almost everything | Big low-detail shapes, fit tests, jigs |
The print-time row is the one that catches people out, and it is the row we can be most precise about, because our own quoting model carries the figure: at 0.2 mm layers we budget 16 cm3 of plastic an hour on a machine, and at 0.1 mm we budget 8 — exactly half. Halving the layer height does not halve throughput by some mysterious inefficiency. It doubles the number of passes the nozzle has to make over the same volume of plastic.
It is not perfectly linear in either direction. Solid top and bottom surfaces are specified as a fixed number of layers rather than a fixed thickness, so a finer setting adds fewer of them than the layer-count ratio implies. Pulling the other way, every layer carries fixed overhead — a Z move, a seam, a slow outer-wall pass — which a finer setting pays far more often. The two effects roughly cancel, which is why layer count is a decent first estimate of the time ratio and never an exact one.
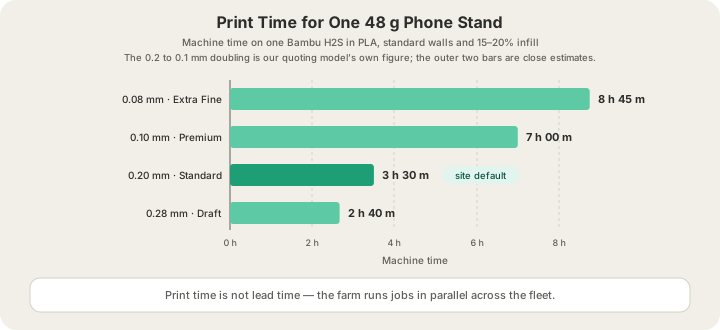
Print time is not the same as lead time, which is worth remembering before you optimise the wrong number. The farm runs jobs in parallel across the fleet, so a plate that takes nine hours does not add nine hours to your delivery date. /blog/how-long-does-3d-printing-take breaks down where the hours in an order actually go.
Layer Height and Strength
Thin layers look like better engineering, so people reasonably assume they produce stronger parts. They usually do not. Every extra layer is another weld line, and in the Z direction a printed part is only as strong as those welds. Thicker layers put down more molten plastic per pass and hold their heat longer, so 0.28 mm layers tend to bond at least as well as 0.08 mm ones and sometimes better. What thin layers genuinely buy you is surface finish and fidelity on curves — not toughness.
The strength lever that does matter is which way the layers run through your part, and that is orientation rather than thickness. /blog/how-to-orient-a-model-for-strength walks through finding the load path and choosing a pose to serve it, including what the strong pose costs in support material. Wall perimeters come second. For a functional part, layer height is a distant third; for a display part it is first.
What Each Height Costs to Print With Us
Our quote is per gram and all-in — filament and normal machine time in one number — so a finer layer height shows up as a quality multiplier rather than as a separate hourly bill. There are two options on the print page and one way around them.
| Option | Layer height | Rate on PLA | A 40 g phone stand |
|---|---|---|---|
| Standard | 0.2 mm | $0.12/g | $4.80 |
| Premium | 0.1 mm | $0.12/g x 1.75 | $8.40 |
| Your own sliced file | Anything, 0.08 and 0.28 included | Billed from the grams and hours in the G-code | Quoted from your slice |
0.08 mm and 0.28 mm are not buttons on the site, and that is deliberate. They are decisions about one specific geometry, and a generic quality dropdown gets them wrong more often than right. If you want either, slice the model yourself in Bambu Studio or OrcaSlicer and upload the sliced file: we take .gcode and .gcode.3mf up to 40 MB alongside STL, GLB and 3MF meshes, and OBJ is not accepted. A sliced file is quoted from what the slicer actually measured — real filament grams and real hours, purge and tool changes included — rather than estimated from the mesh. /blog/how-to-export-sliced-file-bambu-studio has the export steps, start to finish.
The usual rules apply on top whichever route you take: billable weight rounds up to the whole gram, every part has a $1.00 minimum, and US shipping is $7 flat and free over $50. The full breakdown lives on /pricing.
Picking a Layer Height in Ten Seconds
- Will anyone look closely at a curved or sloped surface? If not, use 0.2 mm and stop reading. This covers most parts.
- Yes, and the part is small — roughly fist-sized or less? Use 0.1 mm. The time penalty is bearable at that size and the finish is a different class.
- Yes, but the part is large? Use 0.2 mm and sand or prime the one face that matters. Fine layers on a big part cost hours you will not get back.
- Nothing is visible and the part is bulky — a jig, a shim, a mould, a fit test? 0.28 mm from your own slice.
- Fine relief, engraved text, or a miniature? 0.08 mm from your own slice, and expect it to take roughly two and a half times as long as the same model at 0.2 mm.
FAQ
What is the best layer height for 3D printing?
0.2 mm on a 0.4 mm nozzle. It sits in the middle of the bonding window, prints at a sensible speed, and leaves ridges fine enough that most people never go looking for them. Change it only when you have a specific reason: a visible curve pushes you finer, a bulky part with nothing to look at pushes you coarser.
Does a smaller layer height make a stronger print?
Generally no. Thinner layers mean more layer bonds, each formed from less molten plastic, and Z strength is governed by those bonds. Thicker layers often weld slightly better. If you want a stronger part, change the orientation and add wall perimeters instead — /blog/3d-printing-infill-explained covers why walls beat infill for strength per gram.
How much longer does 0.1 mm take than 0.2 mm?
About twice as long for the same object. That is not a rule of thumb but the figure in our own quoting model: 16 cm3 an hour at 0.2 mm against 8 cm3 an hour at 0.1 mm. The all-in price factor for premium 0.1 mm layers is 1.75x rather than 2x, because doubling the machine time does not change the filament half of the cost.
Can I order 0.08 mm or 0.28 mm layers?
Yes, by slicing it yourself and uploading the G-code. The dropdown on the site offers Standard 0.2 mm and Premium 0.1 mm; anything else arrives as a sliced .gcode or .gcode.3mf file, which we quote directly from the slicer's measured grams and hours. It also means the layer height, walls, supports and infill are exactly what you chose, with nothing re-interpreted at our end.
Ready to get started?
Upload a 3D model for instant pricing, or generate one with AI.