How to Prepare a Multi-Color Print in Bambu Studio
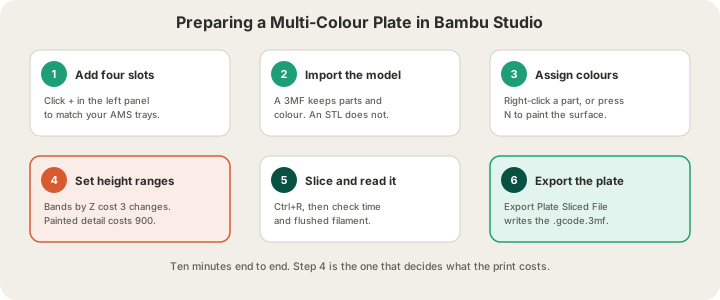
To prepare a multi-color print in Bambu Studio: add up to four filament slots in the left panel so they match your AMS trays, import the model, assign colors either per object (right-click a part and pick Change Filament) or with the Color Painting tool, then slice with Ctrl+R and export the plate as a .gcode.3mf. That is ten minutes of clicking. The part that takes judgment is where you place the color boundaries, because that single choice can be the difference between a $5.02 part and a $45.57 one.
This guide walks the whole workflow on a Bambu Lab H2S or P2S with a four-tray AMS, which is what our farm runs, and finishes with the export that lets a print service quote your file exactly instead of estimating it. If you have never sliced anything before, start with /blog/bambu-studio-for-beginners and come back.
Step 1: Set Up Four Filament Slots
Bambu Studio opens with one filament slot. The small plus button beside it adds more, up to four, and each slot maps to one AMS tray on the machine. Set the material and the color swatch for each one now, before you touch the model, because every coloring tool later refers to these slots by number rather than by name. Slot 1 is the color the printer starts and ends on.
Use the same material in every slot unless you have a reason not to. Mixing PLA and PETG in one job means one of them is printing at the wrong temperature for most of the plate, and PETG's tendency to stick to PLA makes purge towers messy. Four PLA colors is the well-trodden path, and it is what our farm runs on the AMS by default.
Step 2: Import a Model That Can Carry Color
An STL is a bag of triangles. It has no concept of color, no separation into parts, and no memory of anything you do to it, so all the color work happens inside Bambu Studio and lives only in the project file. A 3MF is a real container: it holds separate objects, per-object filament assignments, and painted color data, which is why it is the format to ask for when a designer sends you a multi-part model. /blog/what-is-a-3mf-file goes into the format itself.
If the model arrives as a single fused mesh with no parts, you are painting. If it arrives as an assembly of separate bodies, you can assign a filament to each one and skip painting entirely, which is faster, more precise, and almost always cheaper to print.
Step 3: Three Ways to Assign Color
Bambu Studio gives you three tools for saying which filament goes where, and they produce very different jobs on the printer. The change count in the last column is what a filament change actually costs you: about 84 mm³ of purged plastic and 1.3 minutes of machine time each, on a 60 mm tall model sliced at 0.2 mm layers.
| Method | How to reach it | Best for | Changes on a 300-layer part |
|---|---|---|---|
| Per object or part | Right-click the object, Change Filament | Assemblies, multi-body 3MFs, text on a plaque | A few, or none if parts print separately |
| Height range mode | Color Painting tool, Height Range | Bands, stripes, layered signs, two-tone bodies | One per band boundary, typically 1 to 5 |
| Freehand painting | Color Painting tool (N), brush or smart fill | Logos, faces, detail spread over a surface | Up to one per layer per extra color, so 300 to 900 |
Per-object assignment is the cheapest thing you can do and the most underused. Open the object list on the right, expand a multi-body model, click a part, and set its filament. The printer only changes color when the toolhead moves between differently-colored parts, and if you print each part on its own plate the change count drops to zero.
Height range mode lives inside the Color Painting tool and is the sleeper feature of the whole slicer. You give it a Z height and a filament, and everything above that line prints in the new color. A four-band nameplate needs three boundaries, so three changes for the entire print, and the printer is doing almost nothing except printing. Compare that to freehand painting the same four colors across the model, which changes filament on essentially every layer.
Step 4: Read the Slice Before You Commit
Slice the plate (Ctrl+R) and Bambu Studio switches to Preview. Multi-color prints have three numbers there that a single-color print does not, and all three are worth reading before you send anything anywhere.
- Total time. If a model that should take two hours now says twenty, your color layout is doing that, not the geometry.
- Filament used, broken out per slot. A slot you barely see on the model consuming 30 g is a sign the purge is going into that color.
- Flushed filament, sometimes shown as waste or purge. This is the plastic thrown away at changes, and it is billable weight at any print service.
- Scrub the layer slider through the print. Each toolchange shows as a jump to the wipe tower, so you can literally watch how often the printer stops making your part.
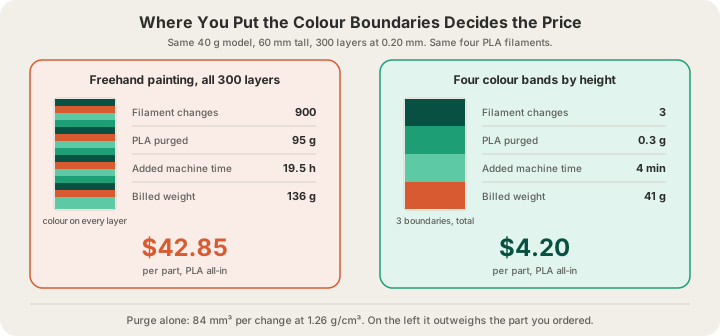
Those two plates use the same model, the same four filaments, and the same 0.2 mm layer height. The painted version purges more plastic than the part itself weighs and holds a printer for the better part of a day. The banded version purges a third of a gram. If the readout surprises you, go back to step three rather than accepting it, because nothing downstream will make a 900-change plate cheap.
Step 5: Cut the Purge Waste
Once the layout is as good as it is going to get, the flush settings are the remaining lever. On the Bambu H2S profile the flush volume matrix is 280 mm³ for any color-to-color pair, and the flush multiplier scales it. The stock 0.3 gives the 84 mm³ per change our quotes are built on. Here is what the other values do to a 900-change plate:
| Flush multiplier | Purge per change | Purged over 900 changes | Verdict |
|---|---|---|---|
| 0.4 | 112 mm³ | 127 g | Safe, wasteful |
| 0.3 (Bambu stock) | 84 mm³ | 95 g | The default our quotes assume |
| 0.2 | 56 mm³ | 64 g | Usually clean, test it once |
| 0.1 | 28 mm³ | 32 g | Expect colour bleed |
Note what that table does not do: even at 0.1 the plate still costs 900 tool changes and 19.5 hours of machine time, which is the larger half of the bill. Flush settings trim grams. Only the layout trims hours. With that in mind, these are the controls worth touching:
- Flush multiplier, under Filament settings. This is the dial in the table above, and 0.2 is the sensible floor for most color pairs.
- Flush into objects and Flush into infill, under Others in the Prepare tab. Sends purge into your model's own interior instead of the bin. It costs nothing visually because it is buried inside the part.
- Flush into supports. Same idea, and effectively free on any print that already needs support material.
- Wipe tower size and position. Shrink it once you have confirmed colors come out clean, and keep it away from the plate edge where it can be knocked over.
- Filament order. Dark into light needs more flushing than light into dark, so arranging the sequence to end on black saves real grams.
Step 6: Export and Send It to the Farm
File, Export, Export Plate Sliced File writes a .gcode.3mf. Export that rather than plain G-code for a multi-color job: the 3MF container carries the AMS slot mapping and a plate thumbnail, so the four colors land on the right trays and your order shows a picture of the real plate. The full export dialog is covered in /blog/how-to-export-sliced-file-bambu-studio. Sliced files upload at /print up to 40 MB.
Uploading a sliced file changes what actually comes off the plate, which is the real payoff for doing this work. For an unsliced model we run our own OrcaSlicer pass, and that pass is single color: nothing downstream of an upload assigns a color to a face, so the part prints in the one filament you pick. A file you sliced yourself is already a multi-color plate — it carries the slot assignments, the purge and the tool changes — so we map your filament slots onto the AMS trays and bill the weight and hours your slicer measured, with nothing estimated on top. If your layout is efficient, that is the difference between paying for 900 changes and paying for three. The reasoning behind those numbers is laid out in /blog/multi-color-3d-printing-explained.
We accept STL, GLB, 3MF and G-code (.gcode and .gcode.3mf); OBJ is not accepted, so convert it before uploading. Every file passes G-code safety validation before it reaches a machine. PLA is $0.12 per gram all-in with a $1.00 minimum per part, billable weight rounds up to the whole gram, and US shipping is $7 flat and free over $50. Build volume on the H2S is 340 x 320 x 340 mm. Full rates for every material are on /pricing, jobs run under live cameras, and Austin customers can skip shipping entirely and pick up.
FAQ
Do I need Bambu Studio to order a multi-color print?
You need Bambu Studio or OrcaSlicer — either one exports the file. What you cannot do is skip the slicing. A colored GLB or 3MF uploaded at /print comes back in a single filament, because nothing between the upload and the printer assigns a color to a face; the color has to be baked into the plate before it gets here. If you would rather not slice, print each color as its own part and assemble.
How many colors can I use in one Bambu Studio plate?
Four on a single AMS, one per tray, and that is the ceiling on our farm's machines too. If a design needs more, split it into pieces that print separately and assemble. That also removes every filament change, so a five-color assembly printed as five parts is often cheaper than a four-color single piece.
How do I reduce purge waste in Bambu Studio?
Fix the layout first: height ranges instead of freehand painting cuts changes from hundreds to a handful, and nothing in the settings comes close to that. Then enable Flush into objects and Flush into infill so purge ends up inside your part, order filaments light to dark, and shrink the wipe tower once a test confirms colors come out clean.
Will you print my sliced file exactly as I sliced it?
Yes. A .gcode.3mf is finished printer instructions, so we run the toolpaths you exported after a G-code safety check, on the printer profile you sliced for. Match the profile to an H2S or P2S with the nozzle you selected and there is nothing to reinterpret. That also means any mistake in the file gets printed faithfully, so read the Preview numbers before exporting.
Ready to get started?
Upload a 3D model for instant pricing, or generate one with AI.