Slicing Mistakes That Ruin Prints
Most ruined prints are not the printer's fault. They are decisions made in the slicer minutes earlier: a first layer set too high, an overhang left unsupported, a part oriented so its layer lines run straight across the load, a wall drawn thinner than the nozzle can physically extrude. Eight mistakes account for the overwhelming majority of failures we see come through the farm. Here is what each one looks like on the finished part, and the specific setting that fixes it.
Why Slicing Mistakes Ruin More Prints Than Hardware Does
A modern CoreXY machine is a very obedient robot. It will run the toolpath it is given, at the temperature it is given, for as long as it takes, and it has no opinion about whether the result is any good. Every genuinely interesting decision — how hot the plastic is, where the seam falls, whether there is anything holding up that overhang, which way the part faces — was already made and frozen into the G-code before the printer ever saw it.
That is why troubleshooting almost always points backwards. When a part droops, warps, delaminates, or snaps in your hand, the failure was authored in the slicer, and the machine simply carried it out faithfully. The good news is that slicing mistakes are cheap to fix. Every one below is a setting, a checkbox, or a rotation, and none of them cost extra material.
The Eight Slicing Mistakes at a Glance
| Mistake | What you see on the part | The fix |
|---|---|---|
| First layer too high | Separate threads, lifted corners, part comes loose | Auto-level, squash layer one, add a brim |
| Overhangs unsupported | Drooping strands under flat undersides | Support threshold at 50 to 55 degrees |
| Supports fused to the part | Torn surface where supports were removed | Top Z distance of exactly one layer |
| Orientation fights the load | Looks perfect, snaps on first use | Rotate so layers run along the load |
| Walls under one line width | Ribs and text missing entirely | 0.85 mm minimum, 0.6 mm raised text |
| Wrong material profile | Stringing, weak layers, jammed extruder | Match the profile to the spool |
| Scale or units unchecked | Part is 25x too small or 1000x too big | Read the X/Y/Z box before slicing |
| 100% infill as a strength fix | Heavy, expensive, still breaks | Add wall perimeters instead |
Eight Slicing Mistakes and How to Fix Them
1. A First Layer That Never Bonded
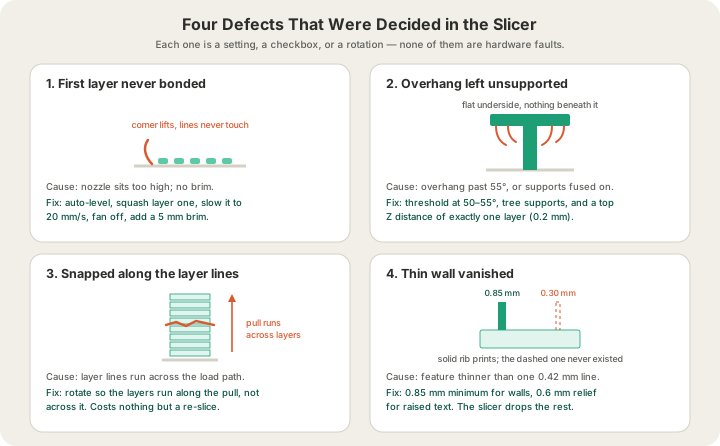
Watch the first layer, not the model. If the extrusions sit as separate round threads with daylight between them, the nozzle was too far from the plate. If corners curl by layer twenty, the footprint was too small or the cooling too aggressive. Either way the print has already failed and everything above it is decoration.
Run the machine's auto bed levelling, then nudge the Z offset until layer one is a slightly squashed ribbon with no gaps between lines. Slow that layer to about 20 mm/s, turn the part cooling fan off for it, and add a 5 mm brim to anything tall, narrow, or sharp-cornered. ABS and ASA additionally want an enclosed chamber; without one they lift no matter what the slicer says.
2. Overhangs With No Supports, or Supports Welded On
Roughly 45 degrees from vertical is the practical limit for an unsupported wall. Past about 55 degrees the perimeter has nothing underneath and curls up into the fan; past 70 it simply drops. The opposite mistake is just as common: supports generated with a Z distance of zero fuse to the part, so removing them tears the surface off with them.
Set the support threshold around 50 to 55 degrees, use tree supports for organic shapes, and keep the top Z distance at exactly one layer height, which is 0.2 mm on a standard profile. /blog/3d-printing-supports-101 has the full decision tree, including how to chamfer or split a model so it needs no supports at all, which is always the better answer.
3. Orientation That Fights the Load
FDM parts are strong across a layer and weak between layers. A hook printed lying down is dramatically stronger than the same hook standing up, because standing up puts every single layer boundary directly across the direction of pull. This is the mistake that produces a part which looks flawless and breaks the first time it is used.
Work out which way the part will be loaded, then orient it so the layers run along that direction rather than across it. /blog/how-to-orient-a-model-for-strength walks through the common cases, including when you have to trade surface finish or support material for strength. Rotation is the cheapest fix on this list: it changes nothing about material, so it changes nothing about price.
4. Walls Thinner Than One Extrusion Line
A 0.4 mm nozzle lays a line about 0.42 mm wide. Model a rib at 0.3 mm and the slicer cannot print it; depending on the profile it either drops the feature silently or squeezes a single thin thread where you wanted a wall. Embossed text raised 0.3 mm off a surface vanishes the same way. People blame the printer for losing detail that was never printable in the first place.
Nothing thinner than one line width, and 0.85 mm — two lines — for any feature that has to hold. Raise embossed text at least 0.6 mm and cut engraved text at least 0.4 mm deep. Variable-width wall generation helps at the margins, but no slicer can invent material the model does not contain.
5. The Wrong Material Profile
Slicing PETG on a PLA profile means running roughly 30 degrees too cold with the fan at full blast: stringy, delaminated, and weak. TPU on a PLA profile means high retraction and high speed on a filament that tolerates neither, which is how extruders jam. ABS and ASA on an open machine warp off the plate however good the profile is.
Pick the profile that matches the spool, not the one that happened to be loaded last. /blog/pla-vs-petg-vs-abs-vs-asa-vs-tpu compares all five on strength, temperature, and where each one belongs. Material also changes what a print costs: our rates run from $0.12 per gram all-in for PLA up to $0.14 for ASA, and every one is listed on /pricing.
6. Scale and Units Never Checked
An STL carries no units at all. A model authored in inches arrives in the slicer 25.4 times too small; a CAD export in metres arrives a thousand times too large. Both are glaringly obvious in the dimensions box and completely invisible in the 3D viewport, because the viewport zooms to fit whatever you give it.
Read the X, Y and Z figures before every slice. Remember that scale is cubic: doubling a part's dimensions multiplies its volume, its weight, and therefore its price by eight. Our build volume is 340 x 320 x 340 mm on the Bambu H2S, so anything larger has to be split into sections and joined after printing rather than scaled down and hoped for.
7. Reaching for 100% Infill to Fix a Weak Part
When a print breaks, the instinct is to fill it with plastic. It rarely helps. FDM parts almost always fail at a layer boundary or through a thin wall, not through the middle, so a solid core doubles the weight while addressing the wrong failure mode entirely. Solid infill also pumps far more heat into the part, which makes large flat pieces warp more, not less.
Add wall perimeters first. Going from two walls to four buys more real-world strength per gram than any infill increase, and then fix the orientation. The money is not trivial either: at $0.12 per gram, pushing a 60 g part to 100% infill can add twelve dollars to a print that an extra wall would have solved for well under one.
8. Never Opening the Sliced Preview
The preview is the only honest picture of what will happen. It shows the seam line, which the model view hides; islands with nothing underneath them; bridges spanning open air; travel moves dragging a hot nozzle across a finished top surface; and the estimated time and gram count, which is your last chance to notice that the part is 400 g rather than 40 g.
Scrub the layer slider from the first layer to the last before you commit. Two minutes there is far cheaper than an eight-hour failure. If you are exporting a sliced file to send somewhere else, /blog/how-to-export-sliced-file-bambu-studio covers the export step and exactly what does and does not travel inside the file.
What the Farm Catches, and What It Cannot
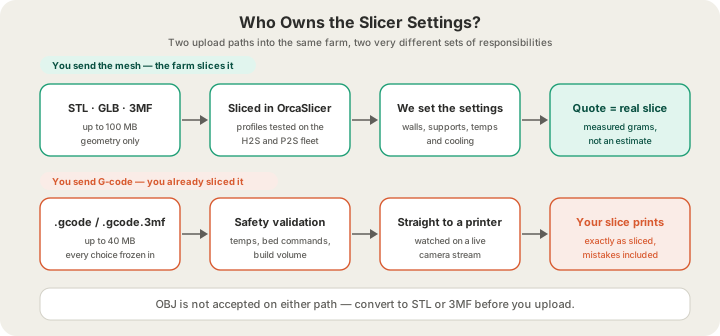
There are two ways a file reaches our printers, and they hand the slicer to very different people. Upload an STL, GLB, or 3MF and we slice it: your model goes through OrcaSlicer on a profile we have tested on the Bambu H2S and P2S machines in the fleet, so temperatures, support thresholds, wall counts and cooling are ours to get right, and the quote you see comes from that real slice rather than a bounding-box estimate. Mistakes one, two, five, seven and eight stop being your problem. Orientation, wall thickness and scale are still baked into the geometry you sent.
Upload a sliced .gcode or .gcode.3mf and you have already made every decision. The file runs through G-code safety validation before it goes near a machine, which checks it against the printer it is destined for: temperatures, bed and chamber commands, and whether the toolpath stays inside the build envelope. That catches files which would damage a printer. It cannot catch a print that was simply sliced badly. Export with no supports under a 70 degree overhang and the machine will faithfully print the droop, on a live camera, while you watch.
FAQ
Why did my 3D print fail halfway through?
Almost always adhesion or an unsupported island. Either the first layer never bonded properly and the part eventually let go of the plate, or a region of the model started in mid-air with nothing beneath it and the nozzle extruded into space. Both are visible in the sliced preview before you press print, which is why scrubbing the layer slider is the single highest-value habit in 3D printing.
Which slicer settings matter most?
First layer height and Z offset, part orientation, support threshold and Z distance, wall count, and the material profile. Layer height and infill percentage get most of the attention online and matter least to whether a print succeeds. Get the first five right and a mediocre choice on the last two still produces a usable part.
Can a print farm fix a badly sliced file?
If you send a mesh, yes, because the farm does the slicing and applies its own tested profiles. If you send finished G-code, no. G-code safety validation checks the file against the target printer for anything dangerous, but it will not re-slice your part or add the supports you left out. Send the STL or 3MF unless you have a specific reason not to.
Does a bad slice cost me more money?
Yes, in two ways. Pricing is per gram all-in, so a slice with unnecessary supports, a solid core, or an inflated scale bills for every one of those grams. And a failed part is a reprint. Uploading the mesh at /print and letting us slice it removes both risks, because the gram count in the quote comes from the same slice that runs on the machine.
Ready to get started?
Upload a 3D model for instant pricing, or generate one with AI.