Painting vs Per-Object Colors vs Layer Swaps
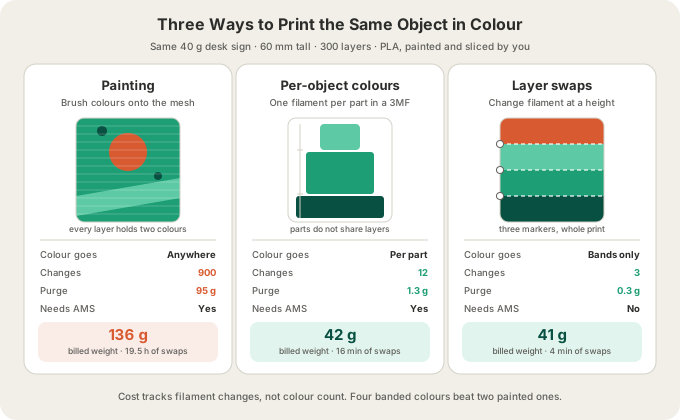
There are three ways to get more than one colour out of a single-nozzle printer with an AMS, and they are not interchangeable. You can paint colours onto the mesh surface in the slicer, you can assign whole objects or parts their own filament, or you can insert layer swaps at chosen heights. All three produce real, solid colour in the finished plastic. What separates them is how many times the printer has to stop and change filament, and since every change throws away 84 mm³ of purged plastic and about 1.3 minutes of machine time, the same four colours on the same model can mean three changes or nine hundred depending purely on which method you picked.
One Nozzle, Four Trays: Why Colour Costs Money
Our fleet is Bambu Lab H2S and P2S machines, each with a 4-tray AMS. The AMS is a filament changer, not a second extruder. When the printer needs a different colour it retracts the current filament, cuts it, feeds the new one, and pushes plastic through the hotend until the old colour is flushed out of it. Only then can it draw the next line. Four trays means four colours available in a job; it does not mean four colours printing at once.
That flush is the whole story. Bambu's own H2S profile in OrcaSlicer specifies a 280 mm³ flush volume for any colour-to-colour pair with a 0.3 multiplier applied, which works out to 84 mm³ of filament pushed out and discarded every single change. At PLA's density of 1.26 g/cm³ that is 0.106 g. On its own it is nothing. Multiplied by the number of changes a layout demands, it becomes the largest line on the invoice — which is exactly the trap the three approaches below either walk into or step around.
The Three Ways to Print in Colour
1. Painting the Model
Bambu Studio and OrcaSlicer both ship a colour-painting brush. You load the mesh, pick a filament from the AMS list, and paint directly onto the surface: a logo on a face, freckles on a figurine, a red stripe that wraps a curved body. The slicer projects your brush strokes down into the toolpaths and assigns each extrusion to a filament. It is by far the most expressive option, and the only one that puts colour where geometry does not already have a boundary.
It is also the most expensive, for a reason that is easy to miss while you are painting. A stripe that runs up the side of a model appears on every layer the stripe crosses. Every one of those layers now contains two colours, so every one of them needs at least one filament change. Paint four colours across the full height of a 300-layer model and you have signed up for roughly 900 changes before a single gram of the part is printed.
2. Per-Object and Per-Part Colours
The second approach assigns filament at the object level instead of the pixel level. A 3MF can hold one object built from several named parts, each pointing at its own filament — a lamp base, a body, a diffuser ring. Because 3MF carries material assignments inside the file (see /blog/what-is-a-3mf-file for what else is in there), the colour decision travels with the model instead of being re-created by whoever slices it. Assemble it in CAD, export one 3MF, and the plate is already coloured.
Whether this is cheap or ruinous comes down to one question: do the parts overlap in Z? Parts stacked in separate height zones cost almost nothing, because the printer finishes one colour's height range before it needs the next. Parts that interleave — a green shell wrapped around a coral core, present together on hundreds of layers — cost exactly as much as painting, because the machine is doing exactly what painting makes it do.
3. Layer Swaps
The oldest method is still the cheapest. In the slicer's preview you drag to a layer, click the add-colour-change marker, and the machine inserts a filament change at that exact height. Everything below prints in one colour, everything above in the next. Four colours means three markers and three changes for the entire print. On a machine without an AMS the printer simply pauses and waits for you to swap the spool by hand; with an AMS it does it itself.
The limitation is absolute: you get horizontal bands and nothing else. No logos, no two-tone faces, no colour that follows a curve. But a startling number of real objects are horizontally banded anyway — labelled organiser bins, a dark base under a light body, a contrast top layer on a coaster, a name plate with a coloured plinth. If your design can be expressed in bands, banding it is close to free.
Painting vs Per-Object vs Layer Swaps, Side by Side
| Painting | Per-object colours | Layer swaps | |
|---|---|---|---|
| Where colour can go | Anywhere on the surface | At part boundaries | Horizontal bands only |
| Set up in | Slicer paint brush | CAD, saved into a 3MF | Slicer layer slider |
| Changes per layer | One or more | Zero, unless parts overlap in Z | Zero |
| Needs an AMS | Yes | Yes | No — a pause works |
| Purge waste | Highest | Near zero to highest | Near zero |
| Survives a re-slice in your slicer | Yes, inside the 3MF | Yes, inside the 3MF | Yes, inside the 3MF |
| Best for | Logos, faces, graphics | Assemblies and multi-part designs | Bands, bases, contrast tops |
What Each Approach Costs
Numbers make this concrete. Take a desk sign: 60 mm tall, 40 g of PLA, printed at 0.2 mm layers, which is 300 layers. On its own that is $4.80 at our $0.12 per gram all-in rate. Now give it four colours five different ways. On a plate you slice yourself, the purge arrives as grams like any other grams, and the hours the weight cannot account for are billed as machine time at $1.50/hr, so what the layout costs is what the layout actually did to the plate.
| Colour layout | Changes | Purge | Billable weight | Change time |
|---|---|---|---|---|
| Single colour | 0 | 0 g | 40 g | — |
| Layer swaps, 4 bands | 3 | 0.3 g | 41 g | 4 min |
| Per-object, 4 parts in separate Z zones | 12 | 1.3 g | 42 g | 16 min |
| Painted 2-colour logo, 140 layers tall | 140 | 15 g | 55 g | 3.0 hr |
| Painted 4 colours, full height | 900 | 95 g | 136 g | 19.5 hr |
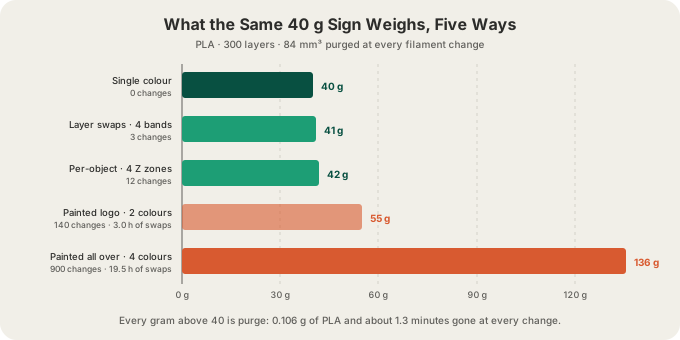
Read the middle rows carefully, because they are where most people actually live. The painted logo is not a rounding error and it is not a disaster: 140 changes and three hours, and it buys something a banded print physically cannot produce. That is a defensible trade. The bottom row is the one to avoid by accident — 900 changes and 19.5 hours of them, more of it machine time than plastic, for a decorative result that a couple of well-placed bands would have got most of the way to.
Which One Should You Use?
- The colour is a horizontal band, a base, or a contrast top — layer swaps. Three markers, near-zero waste, and it works on a printer with no AMS at all.
- The model is already an assembly of distinct parts — per-object colours, exported as a single 3MF. Check that the parts do not share height ranges before you commit.
- You need a logo, lettering, a face, or artwork that ignores geometry — painting, but paint the smallest Z range you can live with.
- The model is a display piece where colour is the entire point — painting, and accept the bill. A 900-change plate is a legitimate thing to order; it just should not be a surprise.
- You are printing 50 of something — reconsider. Multi-colour overhead is per-part, so it multiplies across a batch faster than anything else in the quote. Bands scale; painting does not.
The general rule underneath all of it: cost tracks the number of filament changes, not the number of colours. A four-colour banded print is cheaper than a two-colour painted one. If you want the full accounting of where those grams go and what a purge tower actually is, /blog/multi-color-printing-waste-purge-towers takes the waste side apart, and /blog/how-long-does-3d-printing-take covers what tool changes do to lead time.
How This Works When You Order From Us
Upload at /print in STL, GLB, 3MF or G-code — OBJ is not accepted, so convert first if that is what your tool exports. A file we slice for you comes out in the one filament you chose at upload: painting and per-part assignments inside a 3MF do not survive our slicing, so the plate is a single colour whatever the file described. The colours arrive only if you send a sliced .gcode.3mf. Then the numbers in it are the real numbers, every purge and every tool change already counted, and we quote from those rather than estimating. /blog/bambu-studio-for-beginners walks through producing one if you have not sliced before.
For an unsliced mesh we run a real OrcaSlicer slice on our side to measure it, and it is priced as the single-colour part it is: no colour count, no change estimate, nothing added for the palette the file happens to carry. On a sliced plate, which filament goes in which tray is an explicit step when the job is queued, not a guess. The plate runs on an H2S or P2S in Austin with live camera coverage and G-code safety validation ahead of it, most orders finish inside 24 to 48 hours, and shipping is $7 flat anywhere in the US. Full rates are on /pricing.
FAQ
Do I need an AMS to print in multiple colours?
Only for painting and per-object colours. Layer swaps work on any printer: the machine pauses at the height you marked, you change the spool, and it resumes. That is why banded designs are the standard trick for people printing at home on a single-spool machine. Our fleet has a 4-tray AMS on every printer, so all three methods run here on a plate you have sliced.
How many colours can one print use?
Four at once, because the AMS holds four trays. Layer swaps can technically exceed that if someone reloads a tray mid-print, but we do not run jobs that need an operator standing over them. Four is also more than most designs need — the number of changes matters far more than the number of colours, so a two-colour print painted everywhere costs more than a four-colour banded one.
Why is my multi-colour quote so much higher than the single-colour one?
Because two separate things are in the file you sliced. Purge is real filament — 0.106 g of PLA per change — and it is billed by weight at the same $0.12 per gram as the part. The hours the weight cannot account for are billed separately at $1.50 per hour, and on a plate that swaps every layer that time dominates the bill. Rearranging the colours into height bands removes almost all of both.
Can I paint a model that was generated by AI?
Yes, in your own slicer. Generate the mesh at /design, download it, open it in Bambu Studio or OrcaSlicer, paint or band it, and export the sliced plate. Upload that .gcode.3mf back to /print and the colours print, because by then they are tool changes rather than assignments. Painting is done on the mesh surface, so any watertight model works regardless of where it came from.
Ready to get started?
Upload a 3D model for instant pricing, or generate one with AI.