Designing Logos and Signs for Two-Color Printing
A two-colour logo or sign prints cleanly when the colour boundary is a flat plane parallel to the build plate: raised letters that swap colour once at their base, or letters inset a millimetre into the face. Keep every stroke at least 1.2 mm wide, keep the second colour confined to one shallow band of layers, and the accent costs cents rather than dollars. Draw the same logo with colour running up a vertical edge and you pay for 120 filament changes instead of 10.
Two-Color Printing Is a Geometry Problem
Our Bambu Lab H2S and P2S machines each carry a 4-tray AMS, so four filaments are available to any job without an operator touching the printer. What the AMS does not give you is a second nozzle. Every colour change flushes the old colour out of that one hot end: 84 mm³ per change on Bambu's own H2S profile, a 280 mm³ flush at a 0.3 multiplier. At PLA's density of 1.26 g/cm³ that is about 0.11 g discarded per switch, plus the seconds spent switching, which we bill as machine time at $1.50 per hour.
That one fact decides how you draw the artwork. The slicer does not count colours, it counts crossings. Every layer holding both colours costs one change into the accent and one back to the base; every single-colour layer costs nothing. The design question is not how much second colour there is, but how many layers it appears in.
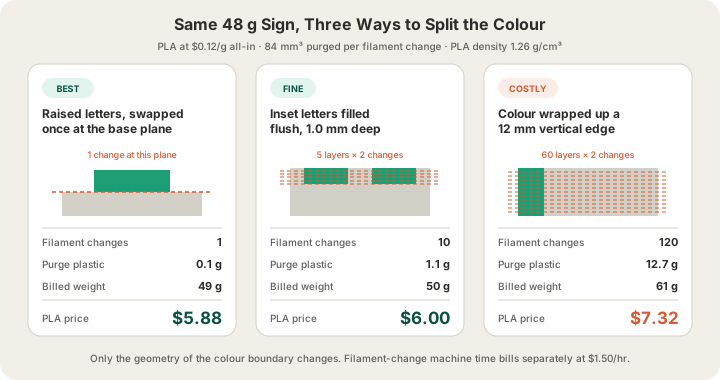
The numbers above come from one real part: a 200 × 80 × 6 mm shop sign, 48 g of PLA at standard 0.2 mm layers, drawn three ways. The artwork, the colours and the outside dimensions never change.
| Colour boundary | Changes | Purge | Billed weight | PLA price |
|---|---|---|---|---|
| Raised letters, swapped once at the base plane | 1 | 0.1 g | 49 g | $5.88 |
| Inset letters filled flush, 1.0 mm deep | 10 | 1.1 g | 50 g | $6.00 |
| Colour wrapped up a 12 mm vertical edge | 120 | 12.7 g | 61 g | $7.32 |
The spread is $1.44 in plastic, easy to shrug off on one sign. The machine time is what hurts: 120 tool changes is a printer standing still, and it repeats on every unit. Across fifty signs, the gap between the first row and the last is most of a printer-day.
The Three Ways to Split a Logo Into Two Colours
Raised type on a flat plate: one change
Model the sign as a flat slab with the lettering sitting on top of it, 0.6 to 1.2 mm proud. The printer lays the whole slab in colour A, changes once at the plane where the letters begin, and finishes in colour B. One change, 0.11 g of purge, no purge tower worth mentioning. It is the most forgiving version to print too, because the boundary is a mechanical edge between two stacks of layers rather than something the slicer negotiates inside one layer.
Inset type filled flush: a handful of changes
Cut the letters into the face as a pocket 0.6 to 1.0 mm deep and fill it with the accent so the finished face is flush. At 0.2 mm layers a 1.0 mm pocket is five layers, and each contains both colours: ten changes, about 1.1 g of purge. This is the look most people picture when they say two-colour sign, and it is easily worth ten changes. Keep the pocket shallow — doubling it to 2.0 mm doubles the changes and buys nothing anyone can see.
Colour on the vertical faces: the expensive one
A logo that wraps a side wall, a stripe up the edge of a plaque, or a sign printed standing upright all turn a one-plane boundary into one every layer has to cross. A 12 mm vertical stripe at 0.2 mm layers is 60 layers, 120 changes, 12.7 g of purge — a quarter of the sign's weight thrown away, plus a purge tower eating build volume beside the part. Occasionally a design needs it; far more often it is an accident of orientation.
Layer height multiplies all of this. Premium 0.1 mm layers double the layers inside a colour band and so double the changes in it: the 1.0 mm inset that costs 10 changes at 0.2 mm costs 20 at 0.1 mm, and the part prices at 1.75× the base rate on top. Lettering with 1.2 mm strokes gives finer layers nothing to resolve; /blog/layer-height-explained covers the cases where they earn their keep.
Stroke Widths, Gaps and Depths a 0.4 mm Nozzle Can Hold
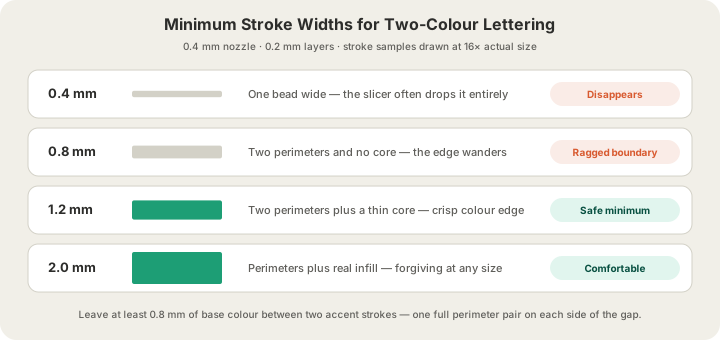
Two-colour type fails at the boundary long before it fails anywhere else. The printer draws every wall with a bead roughly 0.4 mm wide, and an accent stroke needs a pair of those beads plus something between them. Below that, the slicer is making judgement calls about geometry it cannot resolve, and letters come out wandering, merged or missing.
| Stroke width | What the slicer produces | Verdict |
|---|---|---|
| 0.4 mm | A single bead with nothing beside it | Disappears |
| 0.8 mm | Two perimeters, no core between them | Ragged boundary |
| 1.2 mm | Two perimeters plus a thin core | Safe minimum |
| 2.0 mm and up | Perimeters plus real infill | Comfortable at any size |
The same arithmetic governs the gaps. Two accent strokes 0.5 mm apart share beads and merge into a blob; give them 0.8 mm and each gets a full perimeter of base colour, or 1.6 mm if the sign is read across a room. In a medium-weight sans a 1.2 mm stem lands near 8 mm cap height, a sensible floor for two-colour lettering.
- Accent strokes 1.2 mm wide at minimum, 2 mm if the sign lives outdoors or gets handled.
- 0.8 mm of base colour between adjacent accent strokes, 1.6 mm for distance reading.
- Inset pockets 0.6 to 1.0 mm deep. Five layers is more than enough colour.
- Raised type 0.6 to 1.2 mm proud. Taller adds print time without adding legibility.
- No accent geometry on vertical faces unless the design genuinely needs it there.
- Chamfer the bottom edge of the slab 0.5 mm so the first layer's squish does not read as a lip.
Picking Two Colours That Actually Read
Contrast does the work, not saturation. A logo that looks striking on a backlit monitor turns to mud in plastic, because two colours of similar lightness stop separating the moment the light goes flat. Choose the pair for the difference in how light and dark they are, not the difference in hue.
| Pairing | Contrast | Where it works |
|---|---|---|
| Matte black base, white type | Highest | Wayfinding and anything read at distance |
| White base, matte black type | Highest | Nameplates, door signs, clean modern look |
| Matte black base, one bright accent | High | Logos built around a single accent shape |
| Two mid-tone hues, navy and forest | Low | Decorative panels only, type vanishes |
| Silk or metallic on matte | Medium | Looks expensive up close, weak across a room |
Keep both colours in the same material family. Two PLA colours share a hot end temperature and swap without drama; PLA next to PETG forces one temperature to serve both, and the compromise shows up as poor layer bonding in whichever material lost. A design that truly needs two materials is cleaner as two parts that snap together.
Sizing a Sign to the Build Plate
The H2S gives you 340 × 320 × 340 mm. Design to 335 × 315 × 335 mm and nothing surprises you at upload, because brims, skirts and a multi-colour purge tower all need real estate beside the part. Anything longer splits into panels: cut the split along a natural line in the artwork, leave 0.2 mm of clearance per side, add alignment pins. /blog/how-big-can-you-3d-print-build-volumes has the margin arithmetic.
What a Two-Colour Sign Costs
Here is the whole bill for the inset version of that 200 × 80 × 6 mm sign, PLA at standard 0.2 mm layers, painted and sliced as a two-colour plate and uploaded as a sliced file. None of it is guessed from a volume formula — a sliced file is priced from the grams and hours it reports, so the purge and the changes are already inside those numbers.
| Line item | How it is calculated | This sign |
|---|---|---|
| PLA body | $0.12 per gram, all-in | 48 g |
| Purge from 10 colour changes | 84 mm³ per change at 1.26 g/cm³ | 1.1 g |
| Billable weight | Rounds up to the whole gram | 50 g, so $6.00 |
| Filament-change machine time | $1.50 per hour, taken from the slice | Minutes, not hours |
| Minimum per part | $1.00, well clear here | Not triggered |
| US shipping | $7 flat, free over $50 | $7.00 |
| Order total | $13.00 shipped |
Two things move that number in your favour. Austin pickup skips shipping, so the same sign collected in person is $6.00. And bulk is per unit: five signs take 5% off, ten take 10%, which is roughly where a sign run stops being a one-off. Every rate here lives on /pricing.
Getting the Colour Assignment Through the Upload
An STL knows where the triangles are and nothing else: no colours, no materials, no per-face assignments. That matters more than it sounds, because a model we slice for you prints in the one filament you pick, whatever the file looks like on screen. To get the two colours, paint the split and slice the plate yourself in Bambu Studio or OrcaSlicer and upload the sliced plate — the colour assignment and the tray each colour runs from travel inside it. We accept STL, GLB and 3MF up to 100 MB, and sliced .gcode or .gcode.3mf up to 40 MB. OBJ is not accepted. /blog/what-is-a-3mf-file covers what else the format carries, and /blog/how-to-export-sliced-file-bambu-studio walks through the export.
After that it is the farm's problem. Sliced files pass G-code safety validation before they reach a machine, and when the job is queued the filament for each tray is picked as an explicit step rather than inferred from a colour name. Live cameras cover the plate, it ejects itself when the job ends, and most orders leave Austin within 24 to 48 hours.
FAQ
How many colours can a single 3D print have?
Four, from one 4-tray AMS, with nobody touching the printer mid-job. Two is the sweet spot for logos and signs: contrast is what makes lettering readable, and the third and fourth colours mostly add filament changes to a design that was already legible.
Does a two-colour sign cost twice as much as a one-colour sign?
No. The plastic is $0.12 per gram either way, and the extra is purge plus a little machine time at $1.50 per hour. On the inset sign above that came to 1.1 g and a few minutes, taking a $5.76 part to $6.00. Even the badly drawn version, with colour crossing every layer, only reached $7.32.
What is the smallest text that prints cleanly in a second colour?
About 1.2 mm of stroke width, roughly 8 mm cap height in a medium-weight sans. Thinner strokes are one bead wide, and the slicer either drops them or lets the boundary wander. If the type has to be smaller, drop the second colour and emboss it in the base colour instead — a shadow line reads better than a smudged inlay.
Can I send my logo as an image or a PDF?
Not directly, because we print meshes rather than artwork. The logo has to become geometry first, either by extruding the vector in CAD or by describing it to the generator at /design. A mesh we slice comes out in the single filament you choose, so the two-colour version is one you paint and slice yourself. Once it is a mesh, upload STL, GLB, 3MF or a sliced G-code file at /print and the quote comes back in seconds.
Ready to get started?
Upload a 3D model for instant pricing, or generate one with AI.