What Happens After You Click Print
After you click print, your file runs a nine-step gauntlet that mostly happens without a human touching it. The mesh is read and checked for holes and fit, a real OrcaSlicer slice measures how many grams and hours it will actually take, payment writes a manifest of exactly what to make, and the resulting G-code is scanned for unsafe commands before any machine will accept it. Only then does a Bambu Lab printer in Austin start moving, usually finishing, getting inspected, packed and shipped inside 24 to 48 hours. Here is every step, including the ones you never see.
The Whole Journey in One Picture
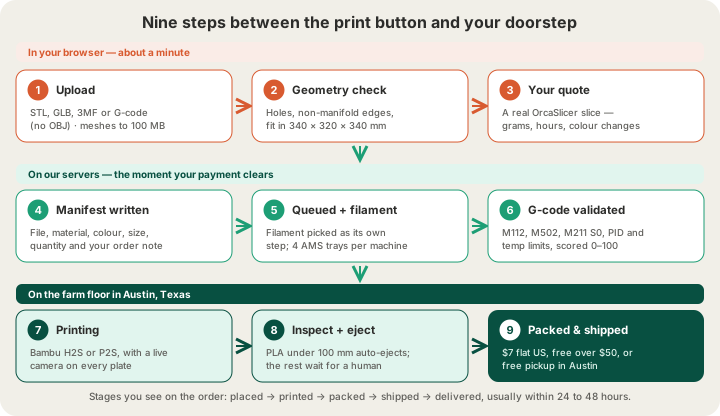
The journey splits cleanly into three phases. The first happens in your browser in about a minute: upload, geometry check, price. The second happens on our servers the moment your payment clears: the order is written down in a form somebody can walk to a printer with, a filament is chosen, and the sliced file is validated. The third happens on the farm floor in Austin, where the part is printed, inspected, packed and handed to a carrier. Everything below follows that order.
Your File Gets Read, Not Just Stored
The upload at /print is not a file drop. Before you see a price, the file is parsed and the geometry is analysed — pure mesh maths, no account and no GPU needed. The point is to answer the question you actually have before you pay: will this come out, or will it fail on the bed?
- Watertight or not — how many boundary edges the mesh has, how many separate holes those edges form, and the width of the widest hole in millimetres
- Non-manifold edges — places where three or more faces share one edge, which slicers resolve unpredictably
- Degenerate faces and inconsistent winding — zero-area triangles and normals pointing the wrong way, the two classic causes of a model that slices into confetti
- Bounding box against the 340 × 320 × 340 mm build volume, so an oversized part is caught now rather than after checkout
- Triangle and welded-vertex counts, plus a flag when the file did not declare its units
That last flag matters more than it sounds. STL and 3MF are millimetres by convention and GLB is metres, so a GLB authored in the wrong scale is off by a factor of one thousand. When the file does not say, the report says it is assuming rather than printing a confident number nobody measured. If any of this is new, /blog/why-print-ready-matters-mesh-validation walks through what a failing mesh looks like and how to repair one.
The Quote Comes From a Real Slice
Most online quoting tools multiply mesh volume by an infill guess and a density, then call it a price. That approach cannot see the things that make a print expensive, because those are decisions the slicer makes. So wherever possible we run your model through a real OrcaSlicer slice on a dedicated service and price the numbers it hands back — deliberately not on the machine that drives the printers, since slicing saturates every core it is given.
| What we need to know | A volume estimate gives | A real slice measures |
|---|---|---|
| Filament used | Mesh volume × an infill guess | Extruded volume, purge included |
| Print time | Nothing usable | Estimated seconds, tool changes included |
| Layers | Height ÷ layer height | The layers Orca actually planned |
| Filament changes | Unknown | Counted, per colour |
| Supports | Invisible | Generated, and weighed with the part |
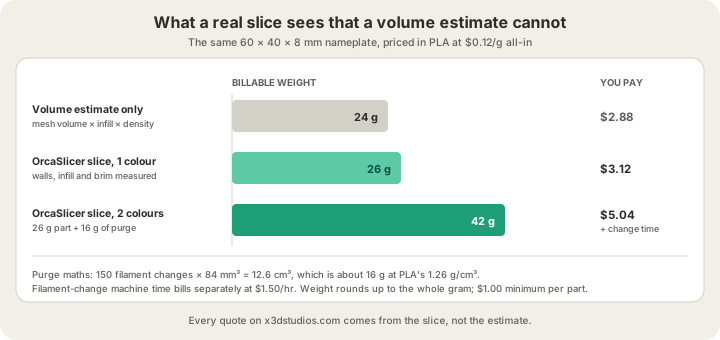
The gap is widest on multi-colour work. Every filament change flushes the nozzle, and Bambu's own H2S profile purges 84 mm³ per change. A two-tone nameplate that swaps colours on 150 layers throws away 12.6 cm³ of plastic, which at PLA's 1.26 g/cm³ is about 16 grams — more than half the weight of the part itself. Those changes only exist in a plate that was sliced for them, which today means a plate you painted and sliced yourself: upload it and the quote comes from the grams and hours it measured, purge included. A model we slice for you is sliced for the one filament you picked, so it is quoted at the single-colour figure. /blog/multi-color-printing-waste-purge-towers covers how to design the purge down.
Pricing on top of those measurements is deliberately boring. PLA is $0.12 per gram all-in, filament and normal machine time together, with billable weight rounded up to the whole gram and a $1.00 minimum per part. Standard 0.2 mm layers are 1×; premium 0.1 mm layers are 1.75× the rate, because they take most of a night instead of an afternoon. Machine time is billed separately only where weight cannot explain it: a sliced file whose measured hours run well past what its weight implies — a plate that spent most of its run swapping filament, say — is charged $1.50 per hour for the excess. The full rate card lives on /pricing.
Checkout Writes Down What to Actually Make
When you pay, an order manifest is written alongside the payment session and read back when the money lands. It carries the stored file, material, colour, quality, quantity, scale, infill and the note you typed in the order box. That note is the part people underestimate: orientation preferences, colour matching, a deadline. If you take the trouble to write printing instructions, the person standing at the printer has to be able to see them, so they travel with the job rather than being collected and thrown away.
Shipping is settled here too: $7 flat anywhere in the US, free over $50, international $30 and free over $500. Local pickup in Austin costs nothing and removes the carrier step entirely. Bulk pricing applies per unit — 5% off at five units, 10% off at ten — which is roughly where a one-off becomes a production run.
The Job Joins the Queue and Gets a Filament
Queueing asks which filament as an explicit step, for every job rather than only the multi-colour ones. It sounds fussy and it prevents the single most annoying failure mode in a farm: a perfectly good print in the wrong colour. Each machine carries a four-tray AMS, so a job that needs black, white, red and one accent can run without anybody touching a spool; a fifth colour means a swap, which is a scheduling decision rather than an afterthought.
The fleet is Bambu Lab H2S and P2S machines. The H2S is the one that sets our published 340 × 320 × 340 mm limit, and it is where large single-piece parts go. Smaller jobs spread across whatever is idle, which is the entire reason a farm beats a fast printer: adding machines shortens the queue, and the queue is where most of the calendar time goes. /blog/how-long-does-3d-printing-take breaks that down hour by hour.
No Printer Accepts a File Until the G-code Passes
G-code is a program, and a print farm that runs arbitrary programs on machines heating to 260 °C is a farm waiting for an incident. Every sliced file is parsed and scored 0–100 against a list of commands that have no business in a print file. Some of them are catastrophic, some are merely suspicious, and the two are treated differently.
| Command | What it would do | Result |
|---|---|---|
| M112 | Emergency stop — hard-kills the printer mid-job | Rejected |
| M211 S0 | Disables software endstops — head into the frame | Rejected |
| M502 | Factory reset — wipes the machine's calibration | Rejected |
| M301 / M304 | Rewrites hotend or bed PID values | Rejected — thermal runaway risk |
| M851 / G28.1 | Moves the Z-probe offset or the home position | Rejected — nozzle crash risk |
| M500 / M999 | Writes settings, or restarts the board | Flagged for a human to look at |
Alongside the command scan, temperatures are checked against per-material ceilings — PLA is capped at a 260 °C nozzle and a 75 °C bed — and the file's declared printer model and footprint are compared against the machine it is being sent to. A file sliced for a 256 mm bed does not silently go to a 350 mm one and vice versa.
On the Plate
Printing itself is the least eventful part. Every plate is covered by a live camera stream, so a spaghetti failure at 3 a.m. is visible rather than discovered at 8 a.m. When the job finishes, the plate is scored for auto-eject: it has to be PLA, under 100 mm tall, between 20 and 150 cm² of footprint, no taller than three times its own width, on a bed at 75 °C or less, and above a safety score of 70. Parts that pass get cooled and pushed off so the next job starts unattended. Tall, skinny or oddly balanced parts fail that test on purpose and wait for a human, because a tipped part is a scrapped part.
Placed, Printed, Packed, Shipped, Delivered
From here the order moves through five stages you can see on your order page. They are set deliberately, and not every one of them is worth an email — a notification with nothing you can act on is just noise.
| Stage | What it means | Emails you? |
|---|---|---|
| Placed | Paid, manifested, in the queue | No — the receipt already covered it |
| Printed | Off the printer and cooling | Yes |
| Packed | Boxed, waiting for the carrier | No — internal milestone |
| Shipped | Handed over, tracking available | Yes |
| Delivered | Carrier confirmed the drop | Yes |
When Something Goes Wrong
Prints fail. A first layer lifts, a support snaps, a colour reads wrong against the reference. The difference a farm makes is that the failure is caught before it becomes your problem: the part goes back in the queue and prints again on whatever machine is free, which usually costs hours rather than days because the file, the material and the manifest are all still sitting there. It is the same reason /blog/what-is-a-3d-print-farm exists as a business model at all — redundancy is the product.
FAQ
How long after I click print does my part actually start printing?
The checks, slice and quote take about a minute. After payment, the manifest, filament selection and G-code validation are fast; the real variable is how long the job waits for a free plate. Most orders are printed, inspected, packed and shipped inside 24 to 48 hours from Austin.
Does picking a second colour change my quote?
Not on a model we slice for you. That slice runs in the one filament you chose, so the same part is the same price whatever colours its design holds. Colour changes reach a quote only through a plate you sliced yourself, because the file you upload has already measured them: each change purges 84 mm³ of plastic and adds machine time. A part that swaps colours on every layer can easily double its billable weight without changing shape at all.
Can I send an OBJ file?
No. Uploads are STL, GLB, 3MF and G-code only. Any modelling tool will export STL and the conversion takes seconds. If you want the scale to survive the trip, export 3MF instead — it declares its units, and an STL does not. A 3MF carries colour assignments too, which an STL cannot; our slicing does not act on them, but they survive for the slicer you paint the plate in.
What if my model has holes in it?
You will see it before you pay. The geometry check reports the number of holes and the width of the largest one in millimetres. Small holes usually slice fine; a 12 mm gap in a wall will not. Fix it in your modelling tool and re-upload, or note it at checkout and we will look at it before printing.
Ready to get started?
Upload a 3D model for instant pricing, or generate one with AI.