Seam Placement: Hiding the Z-Seam on Visible Prints
The Z-seam is the vertical scar left where every layer's outer wall starts and stops, stacked up into a line down the side of the part. You hide it three ways: move it somewhere the eye never goes with the slicer's seam position setting or the seam painting brush, shrink it with settings like seam gap and the scarf joint, or design it out entirely with a corner, a groove, or spiral vase mode. Picking the right seam mode gets you most of the way in about ten seconds; painting the seam by hand gets you the rest.
What Causes the Z-Seam
An outer wall is a closed loop. The nozzle has to enter that loop somewhere, travel all the way round, and stop where it began, and the joint between the start and the end is never perfect. Pressure has built up in the melt zone by the time the nozzle arrives back at the start, so it lays down slightly too much plastic there. Then the printer lifts, moves to the next layer, and does it again at the same angle. One hundred layers later those hundred imperfect joins are a visible line.
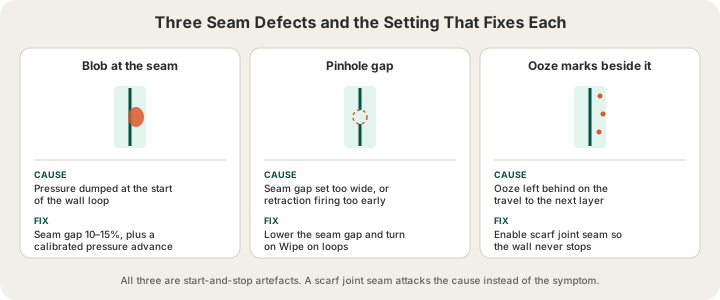
That line shows up as one of three defects, and they have different fixes. A blob is over-extrusion at the loop start. A pinhole is the opposite, a gap where the loop closed short. Scattered zits beside the seam are ooze deposited during the travel move to the next layer. Naming which one you actually have is the difference between fixing it in one print and chasing settings for a week.
The Four Seam Modes, Compared
Bambu Studio and OrcaSlicer both expose seam position under Quality, with four choices. This is the highest-leverage setting on the page and the one most people never touch.
| Mode | Where the seam lands | What you see | Use it when |
|---|---|---|---|
| Aligned | The same angle on every layer, snapped to the nearest sharp corner | One clean vertical line | The part has corners, or a back you can rotate away |
| Nearest | Wherever the nozzle already happens to be | A wandering line that still clusters | Speed matters more than the finish |
| Back | The +Y side of the plate, every single layer | One line at a fixed compass point | Busts and figures with an obvious front |
| Random | A different angle on every layer | No line, but speckles everywhere | Textured, fuzzy or matte surfaces only |
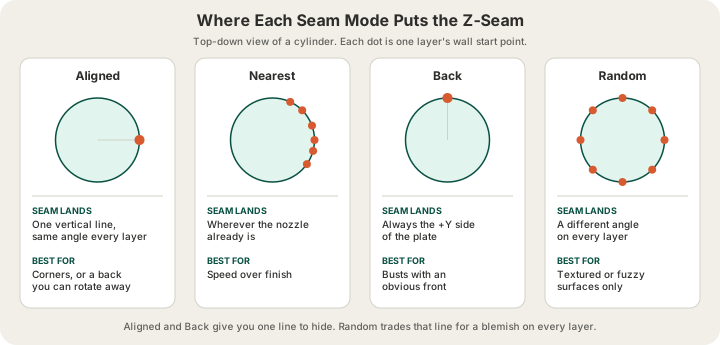
Aligned is the default worth keeping. On a model with any corners at all it does something clever: it prefers concave corners, tucking the seam into an internal angle where light does not catch it. On a smooth cylinder it has nothing to snap to, so it holds a consistent angle and you rotate the whole object on the plate to point that angle at the wall.
Random is the mode people reach for and regret. It does eliminate the line, but it replaces one seam you can hide with a hundred you cannot, spread evenly across the entire show surface. On a glossy PLA vase that reads as noise. It only works when the surface already has texture loud enough to bury it.
Seam Painting: the Precise Fix
When a mode is not good enough, paint the seam yourself. Both Bambu Studio and OrcaSlicer have a seam painting tool that lets you drag a stripe down the model and force every layer's start point onto it, or block the seam from a region entirely.
- Orient the model on the plate exactly as you want it printed. Painting is stored in model space, so this order matters less than with Back mode, but it keeps you honest about which side is the front.
- Select the object and open the seam painting tool from the left toolbar.
- Set a small brush, around 2 to 4 mm, and paint an enforcer stripe straight down a panel line, a rear edge, or a face that will be glued or hidden.
- Paint a blocker over anything precious: a face, a logo, the front of a lettered sign. The slicer will route the seam elsewhere on those layers.
- Slice and check the preview layer by layer. If a layer had no legal place to start, the slicer falls back to its normal rule and the seam jumps out of your stripe.
Painting is also the only reliable answer for organic geometry. An AI-generated bust has no crisp corners for Aligned to find, so it gets a hand-painted stripe down the back of the neck, which is exactly where a sculptor would have put a mould line.
Design the Seam Out
The best seam fixes happen in the model, not the slicer. Geometry decides how much there is to hide in the first place:
| Geometry | Seam visibility | Why |
|---|---|---|
| Smooth cylinder | Worst case | Nothing to snap to; a raised ridge on a curve catches every highlight |
| Faceted or chamfered column | Low | Aligned mode snaps the seam into a facet edge that already casts a shadow |
| Designed panel line or groove | Nearly none | The seam sits at the bottom of a shadow you put there on purpose |
| Fuzzy skin or textured wall | Invisible | The texture is louder than the seam, so the eye never resolves it |
| Spiral vase (single wall) | No seam at all | The wall never stops, so there is no start point to stack |
A 0.6 mm wide, 0.4 mm deep groove running the full height of a cylinder costs almost nothing in material and turns the worst case into the best case. Spiral vase mode is the nuclear option: the Z axis rises continuously so the outer wall is one unbroken helix, with genuinely zero seam. It only works for single-wall, open-topped, no-infill objects, but for lampshades and planters it is unbeatable.
Orientation matters too, and it is the same decision you already make for strength. Standing a part up moves the seam onto a different face and changes which surfaces get layer stepping; our guide to /blog/how-to-orient-a-model-for-strength walks through the tradeoff from the load side, and the seam usually follows the same logic.
Slicer Settings That Shrink the Seam
Once the seam is somewhere sensible, these five settings decide how big it is:
- Scarf joint seam. The strongest single fix. Instead of stopping dead, the wall ramps its Z height and flow over a stretch of the loop so the join is a long shallow overlap rather than a butt. Set it to contour, or contour and holes if internal holes matter, and the line becomes a faint smudge.
- Seam gap. Shortens the loop slightly so the over-extruded start does not get piled on. Around 10 to 15 percent kills blobs. Push it too high and you trade the blob for a pinhole.
- Wipe on loops. Adds a small inward hook at the end of the loop so the residual pressure is dumped inside the wall instead of on the show surface.
- Staggered inner seams. Offsets each inner wall's seam from the one below so the defects never stack into a channel under the outer wall.
- Retraction and pressure advance. A properly calibrated pressure advance value is what stops the nozzle over-delivering at the loop start in the first place. Uncalibrated flow makes every other setting here a workaround.
Layer Height and the Seam
Thinner layers make each individual seam defect smaller, because each one only involves a tenth of a millimetre of extrusion instead of a full 0.2 mm bead. You get twice as many of them at 0.1 mm, but each is half the height, and the result is a finer, more even line rather than a chain of visible knots. On curved show surfaces that is usually the right trade. The full picture on layer height, including print time, is in /blog/layer-height-explained.
It is not free. Premium 0.1 mm layers price at 1.75x our standard rate, so a 60 g PLA vase that costs $6.00 at 0.2 mm costs $10.50 at 0.1 mm. For a display piece where the seam is the whole problem, that is money well spent. For a bracket inside an enclosure it is not. Both rates are on /pricing.
How to Control the Seam on an X3D Order
There are two routes, and the right one depends on how much you want to own. The first is to upload your mesh to /print as an STL, GLB or 3MF and tell us in the checkout note which face is the front. We slice in OrcaSlicer, which is the same slice the quote came from, and we place the seam on the face you nominated.
The second is to slice it yourself. Paint the seam, tune the scarf joint, dial in the gap, and upload the sliced file as .gcode or .gcode.3mf, up to 40 MB. We run G-code safety validation on every sliced upload before it reaches a machine, then print exactly what you sent, seam and all. If you have not exported a sliced file before, /blog/how-to-export-sliced-file-bambu-studio covers it step by step, and /blog/what-is-a-3mf-file explains what the container is carrying.
Either way the part comes off a Bambu H2S or P2S in Austin, Texas, usually inside 24 to 48 hours, with live camera streams running the whole time. If your job needs a colour change, the 4-tray AMS handles it, and we place the seam with the colour boundaries in mind so the two lines do not compound.
FAQ
What is the Z-seam in 3D printing?
It is the vertical line down a print where every layer's outer wall started and stopped. Each layer leaves a tiny blob or gap at that point, and because the printer usually starts each layer in the same place, the defects stack into one continuous scar. It is inherent to how FDM draws closed loops, not a sign of a broken printer.
Which seam setting is best for a cylinder?
Aligned, then rotate the object on the plate so that consistent line points at a wall. A cylinder has no corner for the slicer to hide the seam in, so you are choosing which direction the line faces rather than whether it exists. If the cylinder is a vase and it has no top, spiral vase mode removes the seam completely.
Does the random seam setting actually hide the seam?
It hides the line and reveals a hundred dots instead. Random scatters each layer's start point around the perimeter, so nothing lines up, but every one of those start points is still a small blemish and they end up spread across the entire visible surface. It is a genuine win on textured or fuzzy-skin walls and a step backwards on smooth glossy ones.
Can you remove the Z-seam completely?
Only with spiral vase mode, where the nozzle rises continuously and the wall never stops. For everything else the realistic goal is to make the seam small and put it somewhere invisible. A scarf joint seam plus a painted stripe down a rear panel line gets close enough that most people cannot find it without being told where to look.
Ready to get started?
Upload a 3D model for instant pricing, or generate one with AI.